
I recently decided I needed to upgrade my garage electronics bench to include capability to work on surface mount components. I ordered a hot air reflow station and some no-clean solder paste from SRA.
Solder paste is a little tricky to handle, because most solder paste needs to be refrigerated at 32-50°F to maintain it’s shelf life. Stored at room temp, it tends to get tacky and dry out within a few weeks. Solder paste is also toxic (it contains lead among other things) so it’s not something you want to put in the fridge with your meatloaf.
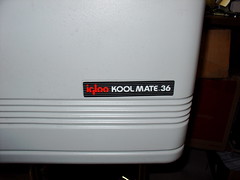
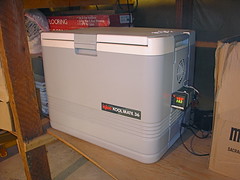
I had an old beer cooler sitting in the garage that Kylie picked up on the street a while back. It uses a Peltier thermoelectric cooler to cool the inside and can achieve sub-freezing temperatures.
Since I didn’t want to leave the cooler on constantly, and below freezing is actually too cold for solder paste, I decided to add a PID controller to the cooler to create a solder paste fridge for the garage. To do this, I needed the following items:
- Love Controls 16A PID Controller found at a surplus store. This one happens to run on 12V and also has a 15V output which made things simple, but other configurations are possible and almost any PID controller should work provided it supports “direct” mode (for cooling instead of heating) and has a relay or switched voltage output.
- K-type thermocouple to measure the inside temperature of the cooler
- power MOSFET capable of switching 12V @ at least 5A, lower on-resistance is better.
- 1k bleed resistor to ensure the MOSFET turns off when it’s supposed to
- a small heatsink for the MOSFET (may be unnecessary, mine doesn’t even get warm)
Since the PID controller happens to run on 12V I was able to use the existing 12V power supply for the cooler to power everything. I configured it so that if the desired temperature is below the current temperature, the PID controller turns on the MOSFET which supplies power to the Peltier cooler and it’s associated fans.
The only hangup I had was that at first I didn’t place the 1k resistor across the output of the controller, and the cooler would stay on constantly. It turns out that because MOSFETs have almost no gate current, once the PID controller turned off it’s 15V output, the gate of the FET would continue to float high. The bleed resistor to ground ensures that this can’t happen, and the FET turns off properly.
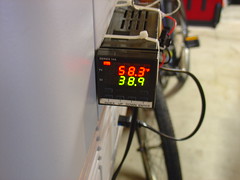
Here’s a picture of the finished solder paste fridge complete with PID controller (click for a larger version).
You can check out a bunch more photos of the cooler on flickr. It should be possible to perform this modification on a more conventional mini-refrigerator as well for better control over the temperature, provided it uses a Peltier cooler, or maybe you could even build the whole thing from scratch using a Peltier cooler off ebay.
http://www.alpha.cooksonelectronics.com/products/paste/solder-paste.asp
JSKC –
The Peltier I am using would definitely be underpowered. It takes a while just to cool down the small volume I have in my cooler.
There are much higher power Peltier coolers around (check eBay), one of those might be a better match for your application. The construction of the cooling chamber will be as important as the selection of the Peltier. If the chamber doesn’t thermally insulate the contents very well, the Peltier cooler will need to work much harder to maintain your target temperature. You’ll have to experiment a bit to see what is realistic, unfortunately I don’t have a simple answer for you. You might look at gutting a mini-fridge – the new ones are Peltier while the older ones are compressor style. Either type might be a good start to your project.
Most PID controllers have an auto tune feature to calibrate the PID loop, but since I’m using simple on-off control I didn’t need to mess with that. I don’t think there is an option to calibrate the temperature reading – they come calibrated from the factory.
Different PID controllers work with different sensors. The most common sensor is the type-K thermocouple. Type-K thermocouples are readily available from many sources, such as McMaster-Carr. Some of the better PID controllers support several flavors of thermocouple (each has it’s own optimum temperature range), and some even support RTD’s as well, but I have never used an RTD in a project before. They operate on different principles and are generally more expensive.
I’m considering making a peltier fridge in order to control beer fermentation temperatures. The enclosure will be much bigger than your cooler, about 21 cubic feet (2*3*3.5). I was wondering, as I have no experience with the peltier, whether, with appropriate cooling on the hot side, if you thought one peltier would be sufficient to keep the fridge’s temperature between 60 and 70 degrees F. I was also wondering if and how you calibrated the PID. Lastly, can the PID work with any temperature sensor?
Kevin,
I’m pretty confident it can be done – after all many newer mini-fridges use Peltier coolers instead of freon and a compressor.
As far as energy efficiency goes, I’m not sure, but I’d be interested to know if you find out. The number of coolers likely depends on the thermal efficiency of the barrel – how much insulation there is – and how often you intend to open the barrel – too few coolers and it will take forever to get down to temperature again.
I would start small and work up to larger coolers as necessary. The most important thing is to ensure that you can adequately remove heat from the hot side of the Peltier coolers, otherwise the efficiency will drop and the Peltier junctions can overheat and be damaged.
Good luck!
Jeff
This is off topic a bit, but I have a question in regards to turning a oak barrel into a fridge. Would it be possible to use a (or several) Peltier thermoelectric cooler(s) to cool an insulated barrel? Would this be too energy intensive? How can I calculate how big a cooler/how many coolers I would need?
Thanks
The value is not critical at all. 1k was the first resistor I tried and it worked so I stuck with it. Anything from 1k-100k would probably be fine. Below 1k you start to draw a lot of current from the PID controller. 1k draws 15mA which is pretty small and within the ratings of the PID controller.
I’m glad you got your setup prototype working, good luck with the rest of it. If you don’t mind me asking what are you using this for? +-0.2 degrees is a pretty tight window.
Yes it does. I bread boarded the circuit and it works well. Just waiting on my controller. I would like to thank you for all of you expertise. It solved a major problem. Got one more question for Ya. Why did you choose a 1K ohm resistor for the bleed resistor?
Here is the same schematic as before but with the grounds explicitly drawn. Does this answer your question?
Ground side of my 12V supply.
I’m not sure what you mean by the neutral side – do you mean the neutral of the 110VAC supply to the PID? Or the ground side of your 12V supply for the TEMs?
I am using a Magnecraft W621DDX-1 SSR at the present. It has a 100 million
life cycle. I have in my possession Fairchild 6030PL and 6030BLs. I will be using 65w TEMs that will draw about 6A. I have had one of eight SSRs fail in a year. I am using PID on my existing units and am using a computer based program for control. It turn these relays on and off a lot. I am controlling the Temp to +-.2 degree. I need now to do ramp and soaks, and it would be more cost effective to use individual process controllers.
Any idea on how to tie the neutral side of the power supply to the controller?
What are the duty cycle limits on the SSR you are using?
You should be able to tie the ground of your 12V supply to the ground of the 14V control output on the PID and use the MOSFET as shown in the schematic above.
This controller has a 14v DC pulse output. Can I use the negative side of my 12v power supply as the common? If so how would I achieve this. I would like to use mosfet for the duty cycle. SSR have a limited duty cycle and this will be cycling quit a bit.
The controller I am using just happens to accept 12-24VDC directly, so I can use the 12V cooler power supply to power everything. I don’t think PID controllers that run on low voltage are very common, so I got lucky when I found this one. Most of the PID controllers I have seen are like the one you are looking at, where they take 110VAC supply and output a low voltage control.
If you want to use MOSFETs as switches, probably the most important thing to remember is that they can’t switch AC, so you can only use them to control things that run on DC voltage. If you need to switch AC you are better off with a SSR (there were a lot of them cheap on ebay the last time I checked).
Thanks. Got another question for you. The controller I’m Looking at is an Omega 740 series. It has a 100-240v input 14v pulse out. Are you running your controller with line voltage and the TEM on an external power supply?
I thought I read that you used the 12v power supply to run the controller.
If you are how is that done?
William,
Here is the circuit diagram showing how the PID controller is connected to the MOSFET, and how that MOSFET is used to switch the Peltier cooler. The bleed resistor may not be necessary depending on how your controller works. My PID controller is set up to output a switched 15V control signal that is just on/off. I configured the controller so that when the cooler temp rises 5 degrees above the set point (38F in my case), the cooler turns on until the temperature goes below the set point again.
Could you give me the circuit diagram for the mosfet switch. I’m building some cooling chambers and would like to use mosfets insted of SSRs.
Is your controller output on/off or 5V on off?
Thanks
josh – I don’t see any reason why that wouldn’t work. The important thing is to maintain adequate cooling of the “hot side’ of the Peltier junction, otherwise the junction can overheat and be damaged. A decent fan mounted on a CPU heatsink might work if you can move enough air with it. Or alternatively use a separate fan with a duct over the heatsink like the cooler I am using has on it.
Toxic LEAD!!
I was considering using some peltier coolers with an old PC power supply to build a fridge into a storage compartment on my cubicle. I have got some really thick walled boxes that are used for shipping refrigerated medicines. I figured, if I could round up a few used PC heatsinks, I would have no problem building such a thing.
Cool!
those old people down the street had no idea they’re crappy cooler had so much potential.