Gary Dion (N4TXI) created a Wifi Radio to match his entertainment center. His project is inspired by my original Wifi Radio project and shares several of the same parts (such as the Asus WL-520gU wireless router) and design philosophy.
Interesting features of Gary’s version of the radio:
Very cool 4 line VFD display allows more information to be shown at once (and it’s blue!)
AVR sends actual shell commands to the router, which allows the serial console to remain enabled for debugging/other purposes – brilliant!
Nice custom PCB for the ATmega8 microcontroller
Rotary encoder and significantly more advanced control menus
IR remote control support!
More details, photos, and source code are available on Gary’s site.
Thanks to the Make: blog for bringing this project to my attention!
I recently saw David Agans’ book Debugging mentioned in one of the many trade journals I receive (I can’t remember which one). After seeing how much praise it received on amazon.com, I decided to pick up a copy.
Debugging really spoke to me because a large portion of my career has been devoted to finding and fixing hardware bugs. I finished it in just two or three evenings (it’s a quick, fun and engaging read). The examples are particularly interesting and relevant to me because many involve issues with embedded systems. Admittedly, perhaps most fascinating is the one about a living room lamp that turned on anytime the author vacuumed the room.
I highly recommend this book to anyone who regularly troubleshoots issues with any kind of system, software or hardware, mechanical or electrical. This includes engineers of all discplines, circuit designers, computer programmers, helpdesk operators, web developers, auto mechanics, etc.
David’s nine rules of debugging are (with my notes):
Understand the system – Knowing how your circuit, code, or widget is supposed to work will help you fix it. Read the manual!
Make it fail – Knowing how to reproduce the failure is critical to being able to fix it. Also, stimulate the failure, don’t simulate it.
Quit thinking and look – Don’t jump to conclusions and just fix what you think might be the problem. This wastes time when you inevitably guess wrong. Keep an open mind as to what the failure mechanisms could be.
Divide and conquer -Eliminate what is definitely not part of the problem and focus on what’s left.
Change one thing at a time – If you change ten things at once, how will you know which one actually solved the problem?
Keep an audit trail – Being able to reproduce the fix is crucial. Even if you don’t fix the problem, you might discover a pattern or something you overlooked by looking at your notes.
Check the plug – When all else fails, check the obvious stuff that you probably should have looked at first.
Get a fresh view – Someone else may have more experience with the problem than you do or might see the one thing you’re missing.
If you didn’t fix it, it ain’t fixed. – Don’t stop when the problem just disappears. It will surely come back later at the most inconvenient time possible. We’ve all been bitten by this one before. Never again!
There’s even a free poster available on the book’s website to help you remember these rules during your next debugging crisis.
Finally, I bring you the conclusion of my Diamond Chop Saw series!
In this part I’ll cover a few remaining issues, but mostly I’ll report on my use of the machine in the construction of my 47 GHz radio, for which this project was intended. If you’re not already familiar with this project, you might want to go back and start by reading Part 1.
Attaching/Aligning the Blade
Attachment of the blade to the hard disk platters (see part 2) sets the basic accuracy of the tool. If the blade is out of plane the cut will be wider than the blade. If the blade is off center, portions of the blade will wear faster. Achieving perfection is virtually impossible, but I managed to get a ‘good enough’ result.
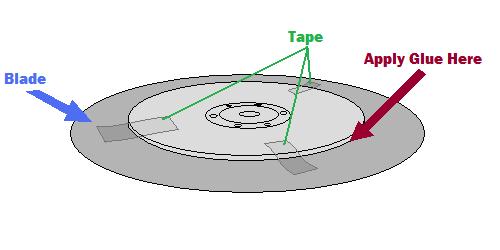
My method was to lay the ring blade down onto the larger platter and use tape to temporarily hold the blade in place while I manually spun it around to check for centering.
Method for centering the blade
A little fiddling and re-alignment will get things pretty close. After the centering is good, the next step is to glue the blade into place. I used tiny drops of Zap-a-Gap around the inner edge of the ring and held the two together firmly as the glue set.
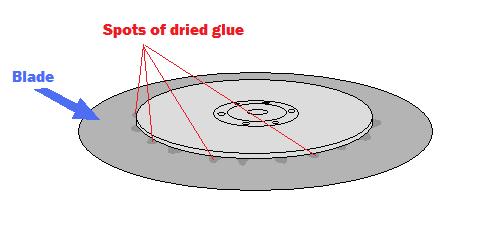
After gluding the blade, spots of glue are visible on the top surface
The result is not perfect, but cuts I have done seem to be sufficiently narrow.
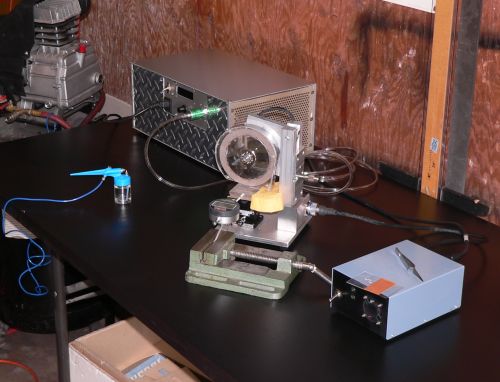
The Cutting Setup
The picture below shows the setup for making cuts. The large silver box in the background is the vacuum pump, the green vise in front is holding a digital indicator (for making precisely measured cuts) and the blue airbrush is ready for spraying water onto the cutting surface.
Dicing saw setup
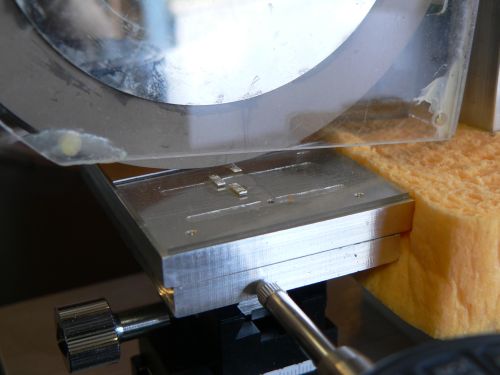
The parts to be cut are mounted on glass slides using Crystalbond adhesive, a thermoplastic mounting polymer.
Test substrates about to be cut
Using the Chop Saw
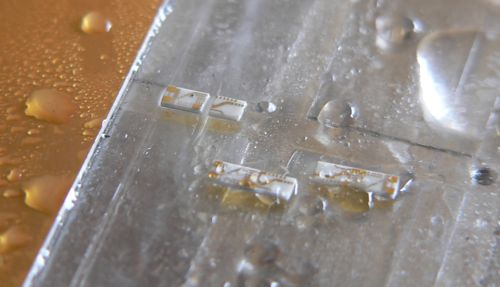
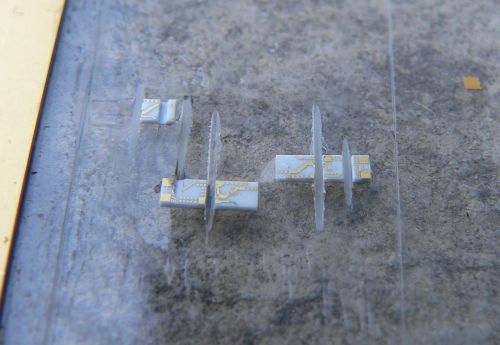
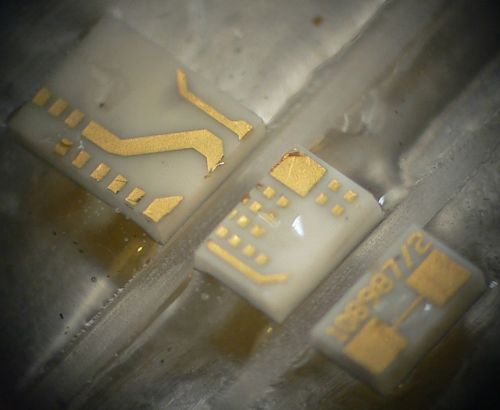
Below are some pictures of cuts made with the saw.
A partial cut through one of the substratesSeveral diced pieces. Microscope view of a part diced into three pieces
From the photos above it is clear that the saw is working reasonably well. The cuts are straight, the pieces have no obvious large chunks missing, and the gold metallization shows minimal signs of peeling. I have made many cuts using this saw including angled cuts. I have also used the saw to carefully strip off the backside metallization. This will come in handy when I am making diveboard-style waveguide transitions. I have also used the X/Y table to feed the piece along the blade, allowing me to make much longer cuts than in “chop” mode. These came out very nicely as well.
The accuracy of the saw is reasonably good. Using a dial or digital indicator, cuts can easily be made with 0.001 inch accuracy, which is sufficient for circuits working through 50 GHz at least.
One issue that was of concern initially was whether a hard drive motor actually had enough power to do the job. It turns out the motor works fine as long as the cuts are made slowly. Fast cuts are not advisable anyway, as the part is more likely to fly off into oblivion. Some of the substrates I cut had fairly thick metal backing and required slower cuts.
Future Improvements
Every project ends up with room for improvement. With this project a few things come to mind including a precision machined spindle with a better mounting mechanism. This would require a much larger lathe than what I own, and some careful though into balancing. Another improvement would be a self-contained coolant sprayer and vacuum pump for the chuck. Setting up the dicing saw currently requires a vacuum pump, an air compressor, and so on. Another nice feature would be a microscopic camera to observe the cutting in action. And finally a CNC retrofit would be nice. All of these upgrades would be handy, but as it is, the saw is immensely flexible and precise. I’m still on the first blade which is showing no signs of wear.
Conclusion
It has been a lot of fun putting together this series of articles and even more fun putting together and using this saw. So if you are planning on putting together a saw like this, happy cutting! If you are just planning on building something with a hard drive motor, they are really handy for certain applications where high precision, high RPMs, and cheapness are required.