Our first four-way podcast! Listen to me, Chris, Dave, and Jeremy chat about Arduino, high altitude balloons, hackerspaces in universities, the Google ADK, and the Maker Faire Bay Area.
Kudos to Skype for enabling us to actually pull this off!
The past few weeks have seen a lot of activity on the MightyOhm Wiki!
Since it was mentioned on the Make: blog last week, helpful readers have been making significant contributions every day.
One highlight of the wiki is the Surplus Electronics Resources page, which I first posted about in February. It has more than quadrupled in size since then and now includes surplus shops in the United Kingdom and Canada in addition to dozens in the United States. If you haven’t seen this page yet, you should definitely check it out.
If you don’t see your favorite electronics surplus store on the list, please add it! Several of these “junk shops” close every year due to rising rents and competition online. Anything we can do to keep them in business will benefit the maker community. One way to do this is by making sure that folks know that these resources exist, and this is where I hope the wiki will help.
I want to express my sincere gratitude to everyone who has been contributing to the wiki. In particular, thanks for making it one of the best directories of electronics surplus stores on the web!
Finally, I bring you the conclusion of my Diamond Chop Saw series!
In this part I’ll cover a few remaining issues, but mostly I’ll report on my use of the machine in the construction of my 47 GHz radio, for which this project was intended. If you’re not already familiar with this project, you might want to go back and start by reading Part 1.
Attaching/Aligning the Blade
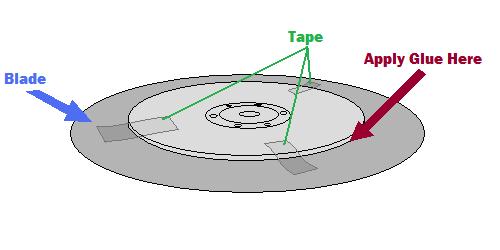
Attachment of the blade to the hard disk platters (see part 2) sets the basic accuracy of the tool. If the blade is out of plane the cut will be wider than the blade. If the blade is off center, portions of the blade will wear faster. Achieving perfection is virtually impossible, but I managed to get a ‘good enough’ result.
My method was to lay the ring blade down onto the larger platter and use tape to temporarily hold the blade in place while I manually spun it around to check for centering.
Method for centering the blade
A little fiddling and re-alignment will get things pretty close. After the centering is good, the next step is to glue the blade into place. I used tiny drops of Zap-a-Gap around the inner edge of the ring and held the two together firmly as the glue set.
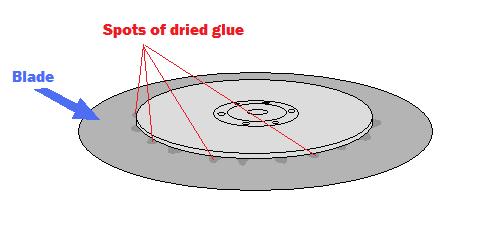
After gluding the blade, spots of glue are visible on the top surface
The result is not perfect, but cuts I have done seem to be sufficiently narrow.
The Cutting Setup
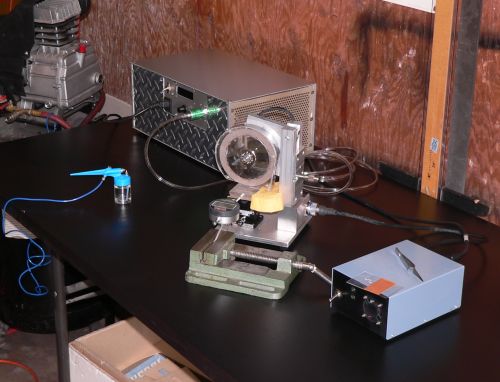
The picture below shows the setup for making cuts. The large silver box in the background is the vacuum pump, the green vise in front is holding a digital indicator (for making precisely measured cuts) and the blue airbrush is ready for spraying water onto the cutting surface.
Dicing saw setup
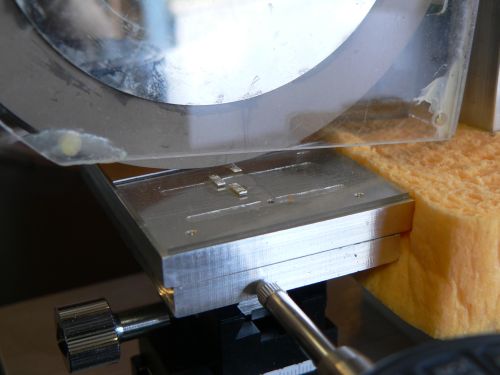
The parts to be cut are mounted on glass slides using Crystalbond adhesive, a thermoplastic mounting polymer.
Test substrates about to be cut
Using the Chop Saw
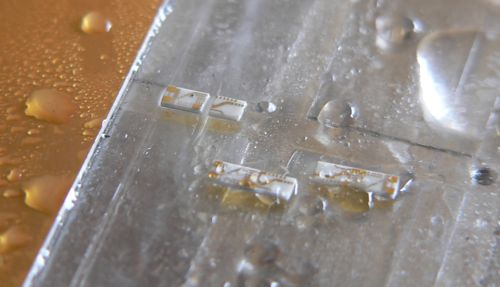
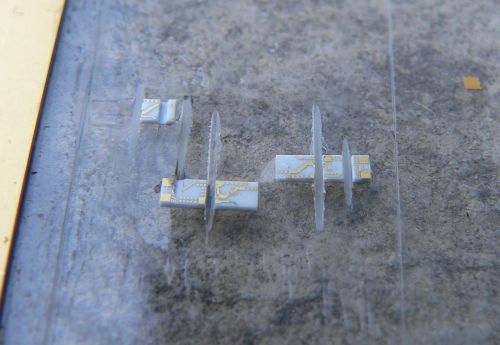
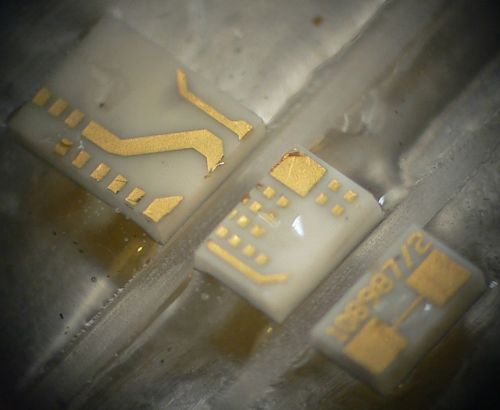
Below are some pictures of cuts made with the saw.
A partial cut through one of the substratesSeveral diced pieces. Microscope view of a part diced into three pieces
From the photos above it is clear that the saw is working reasonably well. The cuts are straight, the pieces have no obvious large chunks missing, and the gold metallization shows minimal signs of peeling. I have made many cuts using this saw including angled cuts. I have also used the saw to carefully strip off the backside metallization. This will come in handy when I am making diveboard-style waveguide transitions. I have also used the X/Y table to feed the piece along the blade, allowing me to make much longer cuts than in “chop” mode. These came out very nicely as well.
The accuracy of the saw is reasonably good. Using a dial or digital indicator, cuts can easily be made with 0.001 inch accuracy, which is sufficient for circuits working through 50 GHz at least.
One issue that was of concern initially was whether a hard drive motor actually had enough power to do the job. It turns out the motor works fine as long as the cuts are made slowly. Fast cuts are not advisable anyway, as the part is more likely to fly off into oblivion. Some of the substrates I cut had fairly thick metal backing and required slower cuts.
Future Improvements
Every project ends up with room for improvement. With this project a few things come to mind including a precision machined spindle with a better mounting mechanism. This would require a much larger lathe than what I own, and some careful though into balancing. Another improvement would be a self-contained coolant sprayer and vacuum pump for the chuck. Setting up the dicing saw currently requires a vacuum pump, an air compressor, and so on. Another nice feature would be a microscopic camera to observe the cutting in action. And finally a CNC retrofit would be nice. All of these upgrades would be handy, but as it is, the saw is immensely flexible and precise. I’m still on the first blade which is showing no signs of wear.
Conclusion
It has been a lot of fun putting together this series of articles and even more fun putting together and using this saw. So if you are planning on putting together a saw like this, happy cutting! If you are just planning on building something with a hard drive motor, they are really handy for certain applications where high precision, high RPMs, and cheapness are required.
If you live in the San Francisco Bay Area and are interested in getting your amateur radio license, there are a couple testing sessions coming up in 2010 that may be of interest:
A “Ham Cram” is a one day workshop where you can get your ham radio license (usually the Technician level) without studying in advance. I’m not sure I completely agree with their methods of blind memorization over actually understanding the rules, but apparently this method works and most people pass on their first attempt. If you’re short on time and want to get your license in a hurry, this is one option.
Thanks to Robert for the heads-up on the January session.
AERO is another SF-based group that regularly posts flyers advertising their own ham cram sessions. Their most recent poster is outdated, but the site mentions there will likely be an upcoming session in February 2010. I just took the General license exam at their November session and was really impressed by how many people were there and how professionally run the event was.
Update: Their next session is on February 7th, 2010 at 8:45AM. Details here.
Studying the old fashioned way:
If you don’t like the “cram” method, you can always pick up a study guide (Technician, General, Extra Class) and spend a few weeks studying for the test like I did for both my Technician and General license exams. There are even a couple online practice tests to help you study. When you feel comfortable with the material, you can take the exam at the sessions above for a $14 VEC fee without doing the cram. I know AERO allows this, but it would probably be a good idea to check and make sure BAERS permits this as well. In either case, I recommend that you RSVP to ensure you get a seat and get notification about changes to the venue, etc. Contact info for each group is on their respective websites.