

Geiger Bot is an iOS application that allows you use your iPhone or iPad as a sophisticated display for an ordinary Geiger counter. It works with most Geiger counters that make an audible “click” for each event or count that is detected.
Here’s how to get your MightyOhm Geiger Counter working with Geiger Bot. These instructions were tested with an iPhone 4, but should work with other iOS devices (iPads and other versions of the iPhone).
Connecting your MightyOhm Geiger Counter to an iOS device
The documentation that comes with Geiger Bot claims that you can collect data by holding your Geiger counter up to the microphone of your iOS device. I didn’t find this to be the case – the number of counts registered was inconsistent and strongly affected by background noise. A direct connection is definitely preferable, so we need devise a way to connect our Geiger counter to our iOS device.
The easiest way to do this is by using the microphone input. Apple uses a 3.5mm 4-way headset connector that is somewhat unusual (you’re not going to find it at Radio Shack). The easiest way to get your hands on the proper connector is to cannibalize a wired headset. Bonus: You get a short length of nice flexible cable for free!
While you could use a genuine Apple headset for this, the quality of the headset isn’t important (since we’re just going to cut it apart anyway). Use the cheapest headset you can find. This one, by Miztech was $3.99 at my local Fry’s Electronics:
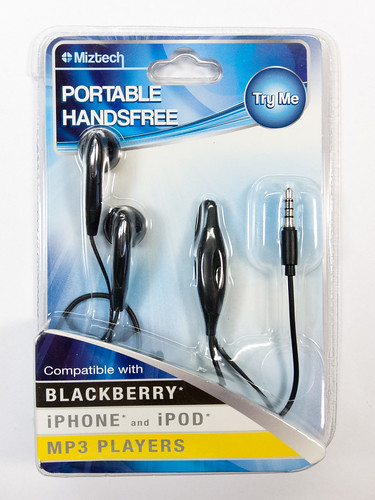
The sales rep actually tried to steer me away from buying such an awful headset (I tested it, the audio quality is horrible), but quickly disappeared after I tried to explain what I planned to do with it.
The pinout of the headset connector is well-documented online, but here’s a quick diagram:
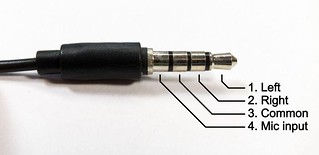
We don’t care about the left and right audio outputs. What we’re interested in is the microphone input and the “common” pin, which we will tie to ground.
Cut the headset wire just before it reaches the strain relief for the microphone and strip away about an inch of the insulation to expose the wires inside. Use your soldering iron to tin each of the wires. It takes a few seconds, but the enamel insulation will dissolve into the solder, exposing the copper wires underneath:
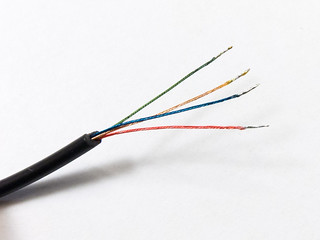
Use your DMM or other continuity tester to determine which wire color corresponds to which pin on the headset connector.
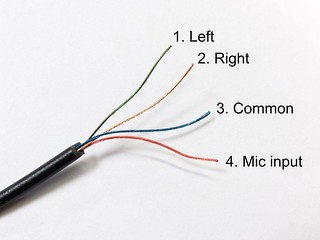
The wire colors vary for different headsets. (Apple uses a completely different scheme for their headsets, and combines the microphone wires in a single twisted pair.) In my case, two samples of the same headset had a different pin assignment (no wonder they didn’t work so well!)
The MightyOhm Geiger Counter outputs a short (100 microsecond) pulse on pin 2 of header J6 (marked PULSE) every time an event is detected. This pulse, which is active high, swings all the way from ground to the full battery voltage of the kit, typically around 3V.
The iPhone microphone input expects a much smaller signal, less than 100mV. (I measured that the microphone input starts clipping around 40mVpp @ 1kHz!)
Before we connect the Geiger kit to the microphone input, we need to reduce pulse signal amplitude to levels that are compatible with our iOS device. This simple circuit will do the trick:

C1 is a ceramic (nonpolarized) capacitor and R1 & R2 are common 1/8W carbon resistors.
I built the circuit on a small piece of protoboard and parts I had in the lab.
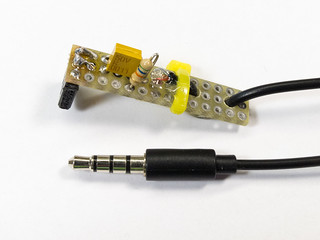
…and used hot glue to protect the delicate headset wires. I made sure to provide ample strain relief for the headset cable. When plugged into the Geiger kit, the resulting adapter looks sort of like a diving board hanging off the side:

It’s not pretty, but it works!
Configuring Geiger Bot
If you haven’t already, open the Apple App Store and install the Geiger Bot application.
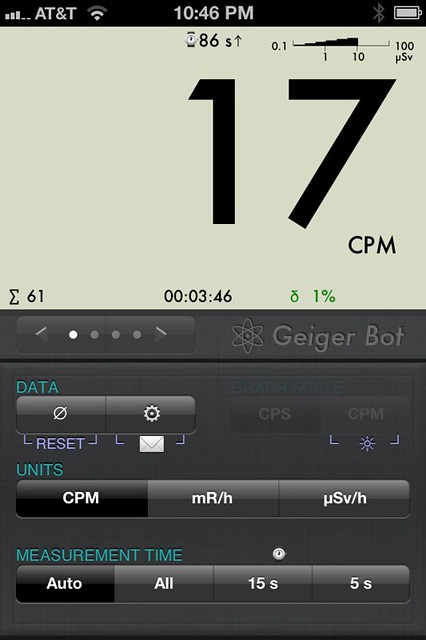
Launch Geiger Bot and you should see the home screen:

Click on the small gear icon to open the settings menu:
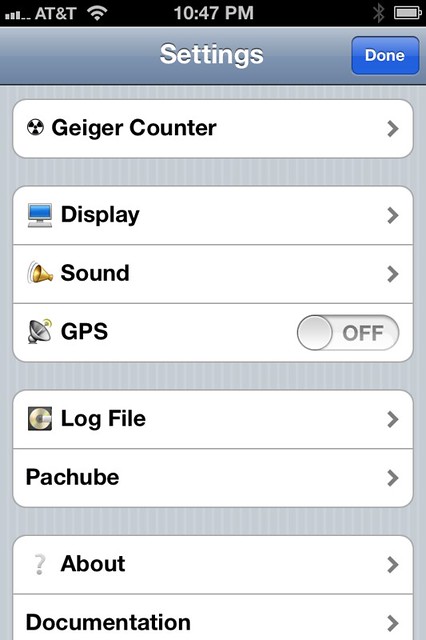
Select Geiger Counter

Select Custom GM Tube…

You can leave the Conversion Factor and Offset alone for now. Select I/O Settings…
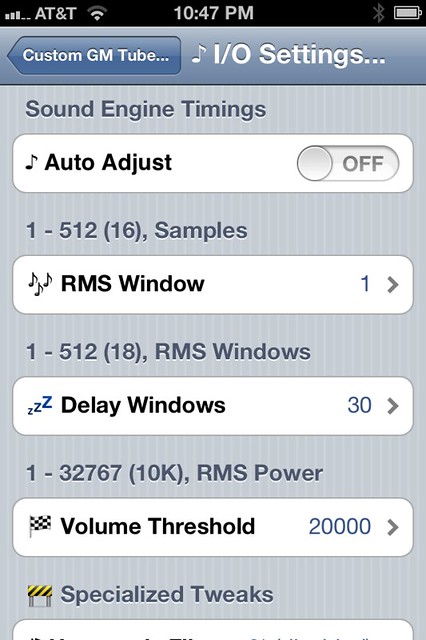
I experienced lots of missed counts with Auto Adjust enabled, so against the author’s instructions I suggest turning it OFF. RMS Window and Delay Windows didn’t seem to have much of an effect, but I recommend starting with RMS Window = 1 and Delay Windows = 30. The Volume Threshold is the most critical adjustment, and I recommend setting this to 20000.
Scroll down to see more settings:
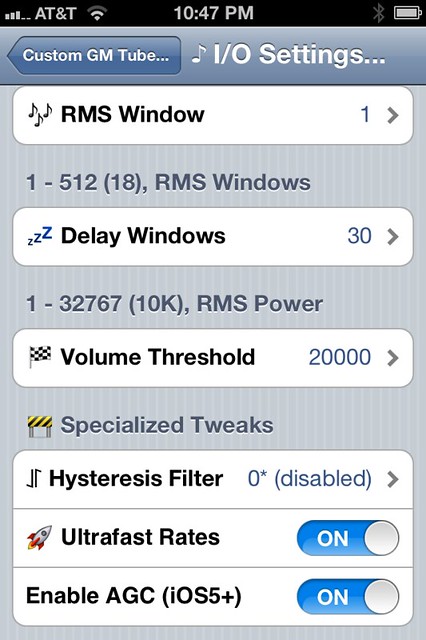
The other critical setting is Ultrafast Rates, this needs to be turned ON to get reliable counts with my kit (I think this is because the pulse length is short compared to other kits). Leave the rest of the settings at the default values.
Return to the settings page and click Done to return to the Geiger Bot application.
Testing
Make sure your Geiger counter is connected to your iOS device. Turn the Geiger counter on. Within a few seconds, you should start seeing counts register on the display:
If you touch the right arrow under the graph a couple times, you can see a display of the pulse signal as intepreted by Geiger Bot. Each vertical peak is a detection event, blue pulses are registered as counts, while black pulses are ignored:

The red line is the volume threshold, and this should be comfortably below the minimum level of the peaks, or you will occasionally miss pulses. If your display looks similar to the one shown, Geiger Bot is working.
That’s it! For more information about Geiger Bot and how to use its many features, consult the Geiger Bot documentation.
Hopefully this helps everyone who has been asking for a way to use Geiger Bot with the MightyOhm Geiger Counter kit!
Enjoy!
Comments or questions? Post in the support forum!
Geiger Bot with the MightyOhm Geiger Counter running in Bariloche, Argentina.
live data in Pachube
https://pachube.com/feeds/53217
Is there any app for Android that replace Geiger Bot, or does it exist for Android?
Rodri,
Very cool, thanks for sharing. It looks like you are testing with some radioactive sources or are under nuclear attack. 🙂
I am not aware of a Geiger Bot-like application for Android.
Jeff, are you sure about the conversion factor (22)? When I was browsing the sources, I saw 57 and blindly put that in Geiger bot (it works, but I don’t have an accurate radiation source to verify).
For the SBM-20, it’s 22 for Co-60 as per the tube sheet.
http://www.gstube.com/data/2398/
I don’t know what 57 would be, Am-241 or something in that lower energy range maybe?
Hey Jeff,
Can I ask how you had the iPhone positioned relative to the counter’s speaker?
Confusingly, there are two microphones on the iPhone 4 and iPhone 4S. Geiger Bot uses the one on the very bottom of the unit, by the dock connector.
Also, enabling Ultrafast Rates will force the delay windows to 1. Otherwise, 30 delay windows with a RMS window size of 1 = 1×30 = 30 total samples = ~1.3 ms.
You’re right that the default settings will miss counts from short pulses via the line input– they are geared towards microphone input and a sound impulse that has a significant volume peak of about 10ms in duration.
So shorter pulses get clipped and averaged out against too samples by the RMS function if the window is too large. Fine detail getting processed into a blurry mess. This results in creating significant amplitude variation artifacts, beyond that which the adaptive filtering is designed to deal with.
I would add separate defaults for the line input but I don’t really have a representative sample to determine baseline values, unfortunately. If you record the output from your counter in Audacity, is the impulse duration approximately 100 microseconds?
Hi Nick,
(it took me a minute to figure out you’re the author of Geiger Bot – cool!)
I tried putting the iPhone microphone right up to the geiger counter speaker, and still got somewhat erratic results. Maybe the high pitched beep (I think it’s 3-4kHz) from the speaker is right on the edge of the passband of the iPhone’s internal microphone circuit?
I recorded a few samples of the signal from the geiger counter when I was trying to optimize the audio levels. I used the Voice Memo app on the iPhone. The sampling rate is 44100Hz, which I think is twice what you are using?
Here’s a sample pulse, shown in Audacity on my PC:
http://www.flickr.com/photos/mightyohm/6839803234/sizes/o/in/photostream/
The pulse is around 6-7 samples long, which is around 100-150us.
The original recording is here (m4a and converted to wav with Audacity):
http://mightyohm.com/files/geiger/20120307%20222413.m4a
http://mightyohm.com/files/geiger/20120307%20222413.wav
Thanks Jeff– appreciate the data. From that audio sample it looks like you should be safe with Ultrafast Rates mode and not getting double counts, as you probably found out already. Which is convenient, as it also allows for the highest count rate.
I also reviewed the other line-in sample data I have; it was about 100us as well though with a slower decay — it looked like it would get double counts with the parameters here.
So I’ll add more aggressive line-in defaults in the next version to ensure there are no missed counts as you initially encountered, but the maximum count rate will be less than your settings here. (at the other end of the spectrum are Ludlum counters with a precise 15ms pulse)
The iPhone microphone is capable of > 4kHz. I suspect the same thing was probably also going on there– a shorter sound duration than was expected. A way to test this would be to drop the RMS window to ~4 samples or so while leaving the rest of the parameters at default with auto-adjust on. Though maybe that’s irrelevant with line input anyway.
Well done. Very clean solution, going through the audio path. Reminds me a little of the approach used by the Square; it’s just a magnetic reader capturing the audio from a cc and converting that into the data embedded on the magnetic stripe. Cool.
Chris,
Yeah, this is the same idea. I have one of the Square readers, and I am really tempted to take it apart. I’d like to see if it’s just a read head in there or some kind of amplifier/filter also.
Now, now, Jeff, no need to mangle your Square reader. This is the future: of course people have posted square teardowns on the internet! http://niraj.de/?tag=squarereaderteardown is probably the best one I found when I had the same impulse a few months back.
Josh,
Of course, I should have known.. Not including the mechanical bits, I see all of… two components?? A magnetic read head and a resistor(?). That must be cheap to produce…
Please, I an Android version with ability to log data on phone’s memory/card.