

So, you want to log data with your Geiger Counter kit?
Here’s how to do it!
You will need:
- A MightyOhm Geiger Counter Kit – available on this site or from one of my distributors.
- A USB-Serial cable
- I recommend the FTDI TTL-232R-3V3, available from many electronics suppliers, such as Adafruit Industries. The cable must operate with a TTL logic level ‘high’ voltage around 3V. Beware, the FTDI cable works well for this but many others do not!
- You can also use the slightly less expensive FTDI Friend, also available from Adafruit.
- A serial terminal program for your operating system:
Step 1: Configure the software
Install the serial terminal program for your operating system. Instructions are included with each of the programs listed above. If you are using Ubuntu, CuteCom is available in the Ubuntu Software Center.
Next, install the drivers for your USB-serial cable. Consult the manufacturers’ website for more information. The drivers for the FTDI cable (and FTDI Friend) are available here and instructions for installing them are here. If you are using Windows 7 or Linux, you may not need to install any drivers at all – they are included with your operating system.
You will also want to figure out what port number or device name corresponds to your USB-serial cable. Instructions for doing this are here.
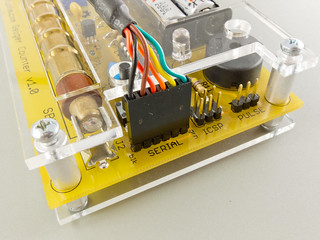
Step 2: Connect the USB-Serial cable to your Geiger Counter
If you haven’t already, plug your USB-serial cable into a free USB port on your computer (and install the USB drivers as detailed in step 1).
Next, connect the FTDI cable to your Geiger Counter kit, as shown. The connector should be oriented such that the black wire is closest to the “blk” silkscreen label on the PCB, and the green wire closest to the “grn” label.
If you are using the FTDI Friend, match the writing on the silkscreen of the FTDI Friend to the labels on the Geiger Counter – BLACK goes towards blk, GREEN towards grn.
Step 3: Configure your serial terminal
Launch the serial terminal program you installed in step 1. If you are using RealTerm on Windows, you’ll see a window like this pop up:

Now it’s time to configure your serial program. I’m going to show how to do this in RealTerm. If you’re using another serial program (or another operating system), the procedure will be slightly different, but the settings are the same.
In the RealTerm window, click on the “Port” tab and you’ll be confronted with a number of options. Don’t worry, this is actually pretty simple: You want to select the serial port number or name corresponding to the FTDI cable (port number 22, in my case), and configure the port as follows:
- Baud: 9600
- Data Bits: 8
- Stop Bits: 1
- Parity: None
- Hardware Flow Control: None
- Software Flow Control: Off (nothing selected)
Aside from the baud rate, the rest of the options should correspond to the defaults. Click “Open”, or if Open is already selected, click “Change”.
Your RealTerm settings should look like this when you’re done (click for a larger version):

Step 4: Turn on your Geiger Counter
Flip on the power switch for your Geiger Counter kit.
You should see the welcome message
mightyohm.com Geiger Counter 1.00
http://mightyohm.com/geiger
and lines of data should start appearing approximately once a second, as shown below:

You might notice some funny characters at the end of each line (CRLF). These are RealTerm’s way of showing you the line endings – other terminal programs will probably not have these characters (and they can be turned off in RealTerm if you don’t like them).
The data should look like this (the numbers may be different):
CPS, 2, CPM, 15, uSv/hr, 0.08, SLOW
CPS, 0, CPM, 15, uSv/hr, 0.08, SLOW
CPS, 0, CPM, 15, uSv/hr, 0.08, SLOW
CPS, 1, CPM, 16, uSv/hr, 0.09, SLOW
CPS, 0, CPM, 16, uSv/hr, 0.09, SLOW
CPS, 1, CPM, 17, uSv/hr, 0.09, SLOW
CPS, 0, CPM, 16, uSv/hr, 0.09, SLOW
Step 5: Log some data
To actually save (or log) some data, click on the Capture tab. Uncheck the “Direct Capture” box. The default file path is probably fine for now.
The steps for other terminal programs will be different. If you get stuck, post in the support forum.

Click “Start Overwrite” and the lower portion of the window will turn red to tell you that a capture operation is in progress.

When you have collected some data, click the “Stop Capture” button to end the capture process.
Open the capture file in Notepad (or another text editor) and you should see lines that look just like what you saw in the terminal window. You have successfully logged some data! (If you’re not following along at home, here is some sample data.)
Step 6: Make pretty graphs
Now that you have some data saved, you can do a lot of interesting things, like make graphs of the background radiation level in your area vs. time.
The captured data is in comma-separated value (CSV) format, which is supported by a wide variety of graphing and spreadsheet software, such as Excel.
To make a simple graph, launch Excel and use the Open file dialog to select the captured data file (in this case, C:\Temp\capture.txt). Make sure the “All files (*.*)” option is selected, or the captured data file might not show up.
Excel will ask some questions about the file. Be sure to select “Delimited” for the data type, and select “Comma” as the delimeter. Click Finish, and the captured data should open as a spreadsheet.
Now you can select the data range you want to plot – usually you will want to highlight an entire column (column F is uSv/hr) and create a Line graph.
Customize the axes and labels and you’ll have something like this:

You’re done!
Conclusion
I hope this tutorial is helpful for folks wanting to log data from their Geiger Counter kit. As usual, if you need help, the best place to find it is in the Geiger Counter support forum.
Have fun!
13 years later, and you can still buy this kit! Perhaps the most fun I’ve had building a kit that I can share with my niece and nephew to teach them about electronics and science.
I designed a neat little case that can be 3D printed, to close up the sides of the kit should you desire it.
https://makerworld.com/en/models/1833601-mightyohm-geiger-counter-case#profileId-1958226
If outside links are not permitted here, you can remove it. Just thought I would share!
Steve,
Sorry for the slow reply!
Thanks for sharing your case design!
I’m glad that you and your niece and nephew are enjoying the kit!
Used the Adafruit cable and the recommended Realterm app on Win 10. Worked perfect right away. I think this current model of Adafruit’s cable autoadjusts btw TTL and 3.3V logic on the header end, so less worries than ever.
Kerry – That’s great to hear, thanks for the feedback!
Kerry,
I need details of the logging system.
Thanks.
For ASCII applications under Windows it’s hard to beat Tera Term. Version 4.69 is the cat’s meow. Very easy to set up, and its logging feature is very simple to invoke. (It also does telnet and SSH if you’re working with a network-capable device. You ARE going to make an ethernet version of the counter, aren’t you?) For binary data though, RealTerm can’t be beat. I use both programs at my job.
Having the Geiger counter output data in comma-separated format was brilliant. I wish half the programmers I worked with had that kind of foresight. It’s sad how many professional programmers don’t think beyond the edge of their programs.
Dave,
Thanks for the kind words. I’m glad someone appreciates the work I put into the serial logging feature of the kit. I toyed with a couple different output formats, but CSV seemed to make the most sense.
I have a really old version of TeraTerm installed on my PC, but I haven’t used it much. I just downloaded the latest version (4.72). I’ll play around with it and see if I like it more than RealTerm for interfacing with the Geiger kit. Thanks for the heads-up.
I had a little bit of trouble finding the Tera Term download page, so here’s a link for anyone else who is interested:
http://logmett.com/index.php?/products/teraterm.html
Jeff
Jeff,
Tera Term did seem to go underground for quite a time, but Google can usually find it. Thanks for posting the link to the newest one.
I believe it’s possible to find, or make, Windows drivers that allow data to be inserted into Excel spreadsheets in more-or-less real time. At work we use a program called HPVee (a test automation language similar to Labview) that can do it. It’s handy for making graphs that update in real time. I’ve also seen Modbus protocol drivers that can do it. I don’t know how you’d go about making such a driver (I don’t do Windows) but it might be worth searching out.
Dave
Dave,
That is an excellent suggestion, and something I have seen before as well. I’ll have to look into how to get the data directly into Excel.
Thanks!
Jeff
Another cross platform serial terminal program is CoolTerm:
http://freeware.the-meiers.org/
Thanks for the tip, Peter.
Also, there’s always minicom. 🙂
Do not forget putty, not only a ssh klient, but also telnet and serial.
Usually you don’t have to fiddle with the port configuration either. It figures it out.