… and Adafruit Industries!
Friday, October 14th, 2011Adafruit Industries is now selling my Geiger Counter kit!
Thanks to Phil and Limor @ Adafruit for making this happen!
(Woohoo!)
Adafruit Industries is now selling my Geiger Counter kit!
Thanks to Phil and Limor @ Adafruit for making this happen!
(Woohoo!)
I am a big fan of VirtualBox. I have used it in various forms over the past couple years: to run Windows within Linux, Linux within Windows, Linux within OSX, Windows within OSX, etc. It is fast, powerful, configurable, and best of all, free.
However, there is one major disadvantage to using a virtual machine for hardware development. Sometimes USB devices don’t get along with the VM very well. What’s worse is that sometimes certain combinations of host and guest OS will work for a given USB device, while others won’t. This can make debugging very frustrating!
I recently set up VirtualBox on my Windows 7 x64 PC so that I could run Ubuntu 10.04 alongside Windows. Everything was going great until I plugged in my Adafruit Industries USBTinyISP so I could flash an AVR from within the Ubuntu virtual machine.
Instead of seeing the USBTinyISP show up on the VM, I got something like this:

The USBtinyISP is shown as “State: Captured:” in the VirtualBox USB device menu but there is no checkmark along side it, it doesn’t show up in lsusb, and avrdude can’t find it either.
When I tried to attach the USBtiny in Virtualbox again, I got this error message:

Bad news.
I tried various combinations of relaunching VirtualBox, rebooting, adding USB filters to the VM, unplugging, replugging, etc. No dice.
I decided that there must be an issue with the USB stack running on the USBTinyISP. Most USB devices can handle the hand-off between the Windows host and the Ubuntu virtual machine, but for some reason the USBTinyISP can’t. (It’s also worth mentioning that the Atmel AVRISP mkII programmer doesn’t work with Virtualbox either. It shows up but can’t flash a device. I’ll have to look into this someday, but since I mainly use the USBTinyISP, fixing the AVRISP wasn’t a priority.)
The firmware that powers the Adafruit USBTinyISP is based on Dick Streefland’s usbtiny project. Dick has released a couple more revisions of his code since the v1.3 release that Limor Fried used to create the USBTinyISP v2.0 firmware. There have been a few bug fixes and improvements to the code, including some that address USB enumeration/communication issues. In addition, the usbtiny code now includes a branch specifically for the USBTinyISP. A pre-compiled hex file is provided for easy flashing to an ATtiny2313.
I was hopeful that these fixes might solve my Virtualbox problems, so I downloaded Dick’s new usbtiny-1.5 source and used my spare AVRISP mkII (within Windows) to burn the main.hex file to a spare ATtiny2313.
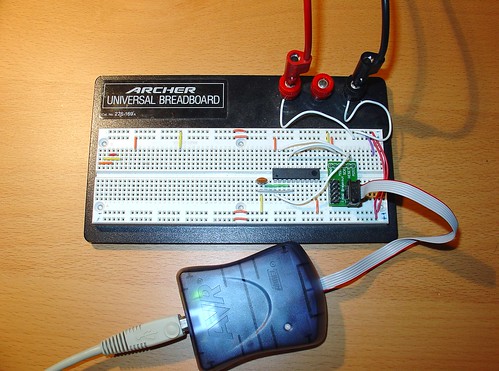
The USBtinyISP source sets the fuses on the ATtiny2313 for an external clock, so I had to wire up a ceramic resonator (small orange blob to the lower left of the AVR) to verify the AVR after setting the fuses. You can see my Sparkfun AVR ISP adapter on the right. I also wired up an external 5V power supply (the test leads at the top of the breadboard).
After burning the new usbtiny-1.5 firmware to the ATtiny2313, I installed it in my USBTinyISP and connected it to my computer.
At first, I still couldn’t get the USBTiny to attach to the VM if I plugged it into my PC and then selected it from VirtualBox’s USB menu.
However, when I created a USB filter in VirtualBox for the USBTinyISP and restarted the VM, it started working! This was a huge improvement over the original firmware, which never worked once, despite all of the combinations I tried!
Here is the USB filter setup, accessible from the VM settings:
Note that the revision is now shown as 0105 (instead of 0104 with the old usbtiny firmware):
lsusb shows the USBTinyISP (1781:0x9f Multiple Vendors) and avrdude no longer complains about finding the programmer. (The initialization failed message shown below is because I didn’t have an AVR connected.) The red LED on the USBTinyISP flashes when I run avrdude – a sure sign that the VM is communicating with the programmer.
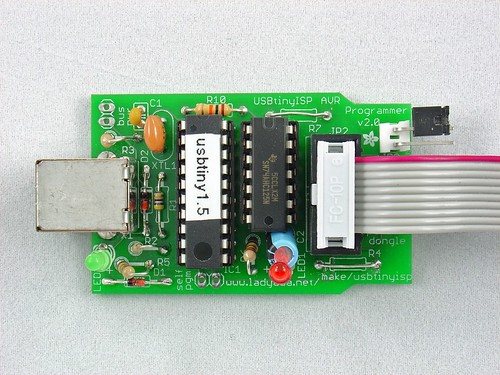
Here is my modified USBTinyISP, with the reflashed ATtiny2313 and shorted R4 & R7 (handy for programming devices that try to pull up/down the SCK/MOSI lines!)
I hope this helps anyone else who is trying to get the USBTinyISP working in Virtualbox on Windows. It may help solve other USB problems as well – the fixes in the newer usbtiny code may apply to other situations as well. If you are having problems with USB and the USBTinyISP, try upgrading the firmware and post your results here!
For some time now, those wanting to use the Adafruit Industries USBTinyISP with the 64-bit versions of Windows 7 or Vista were faced with the following errors when attempting to install the device drivers supplied by Adafruit:
For some reason, the 32-bit versions of these operating systems don’t prevent the unsigned drivers from being installed, although they do complain.
There are a few workarounds that involve hacking Windows or disabling digital signature checking, but thanks to a tip by user wayneft on the Adafruit support forums, I was able to make the process much more straightforward.
The USBTiny drivers are based on libusb-win32. Based on some notes I found on the libusb-win32 wiki, I discovered that the latest libusb drivers contain a proper digital signature:
Vista/7 64 bit are supported from version 1.2.0.0 since a Microsoft KMCS accepted digital signature is embedded in the kernel driver libusb0.sys. libusb-win32 based device drivers can also be submitted for Microsoft WHQL testing. Several companies have successfully finished the WHQL testing with their libusb-win32 based driver package. This will allow the customers to install the driver without a warning under current 32bit/64bit Windows.
This is good news!
I downloaded the latest version of libusb-win32 (1.2.1.0) and used the included inf-wizard tool to create new drivers for the USBTinyISP:
usbtinyisp_libusb-win32_1.2.1.0
I used the Windows device manager to upgrade the broken drivers on my Windows 7 64-bit machine. There is still a warning that “Windows can’t verify the publisher of this driver software” but there are no more errors about digital signatures and the new drivers appear to install and work correctly.
I haven’t done a huge amount of testing with the drivers, but I was able to communicate with the USBTiny via avrdude and flash a simple program to an AVR. I also haven’t tested this fix on Vista, as I don’t have access to a computer running it. If anyone tests these drivers on Vista x64, please post your results in the comments!
This weekend I hosted a post-Halloween kit building party at MightyOhm HQ.
Nine close friends built Conway’s Game of Life kits from Adafruit Industries. This is my favorite kit for these kinds of workshops because it’s easy for beginners to complete in about 2 hours, and when everyone is done, you can wire all of the kits together to create one large cellular automata display. The last time I helped people build this kit was at a Make:SF workshop at the TechShop in Menlo Park.
Here’s a timelapse video of the afternoon, shot with a Logitech QuickCam Vision Pro webcam on an Eee PC 4G running Booru Webcam 2.0.
The capture interval was 5 seconds. I used Quicktime Pro to stitch the images together at 15fps and iMovie to add titles and music (Turbo Outrun by FRP from remix.kwed.org.)
I wore my Halloween costume for most of the afternoon. What am I? Most people on the streets of San Francisco had no idea…
Stuart was the first to finish his kit:

Soldering the kits together to form the matrix:

Nine happy kit-builders with the 3×3 matrix they created with their finished kits:

And lastly, a video of the 3×3 matrix in action:
Three people had little to no soldering experience at the beginning of the afternoon. Everyone who came went home with a working kit. Success!
Many people have asked me for a cost breakdown of my Wifi Radio project. Well, here it is!
I added a link to possible sources for as many parts as I could. However, there were a few things I scrounged from local surplus electronics stores and couldn’t easily find a good equivalent online. I’m not expecting everyone to copy my design exactly (not everyone has a woodworking shop at their disposal), so use these numbers as a rough estimate only.
If you shop around you should be able to beat the listed prices on many items, so I see this as sort of a worst case scenario.
Total: $65.48
Total: $52.06
(This is on the high end, the interface can certainly be built for less by using scrounged/surplus components.)
Total: $29.55
Oh yeah, and I almost forgot…
Grand total (excluding the box) – $147.09
If you take out the cost of the development tools, namely the FTDI cable and the USBtinyISP, the total comes out to $105 (without the box).
By scrounging materials and using parts from your junkbox you should be able to reduce that figure even more, but obviously the grand total hinges on what kind of enclosure you use. Not everyone has a friend with serious woodworking skills willing to donate time and materials, but use this as an excuse to get creative.
I wanted a box that showcased the time and effort that I spent on the electronics inside, but that doesn’t mean an old boombox from the Salvation Army couldn’t work just as well.
When I first started this project, my goal was to keep the total parts cost under $100. On paper, it looks like I came pretty close to that, thanks to the donated box and excluding the reusable development tools like the FTDI cable and AVR programmer. To be honest, I probably spent twice that amount on spare power supplies, extra knobs, a second router to bring to NOTACON, and a bunch of other stuff that I didn’t end up using in the final project. But I’m pretty ok with that. I think this just highlights the fact that:
If you just want a Wifi Radio, it will always be cheaper to buy one off the shelf. But if you make your own, it will be infinitely more rewarding.
It certainly has been for me.