Tag Archives: SMT

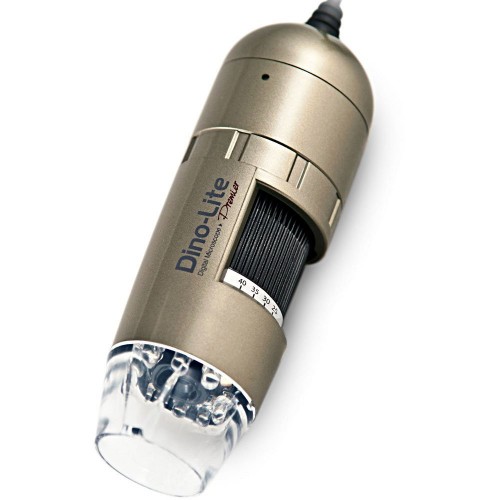
Cool Tools: Dino-Lite AM4113T USB Digital Microscope

61V-Rea54FL._SL1000_

The Dino-Lite Pro AM4113T 1.3MP Handheld Digital Microscope is a surprisingly handy tool for inspecting all sorts of fine details at home and on the road. The small size and light weight are ideal for travel. I keep this microscope along with several other tools in my “go box” of electronics supplies for overseas travel.

Dino-Lite offers a wide variety of digital microscopes with a similar basic design to the AM4113T but varying resolution and other features.  This particular model is not cheap ($399), but the extra resolution and features of the “Premier” series scopes are handy.  If you don’t need these features, there are several lower cost options available, including the lower resolution AM311S (which I have not used myself but gets generally positive reviews).

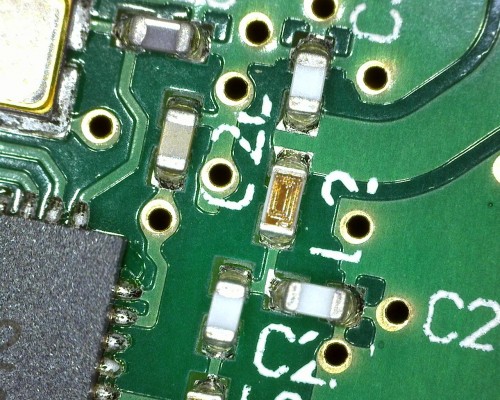
Here’s a sample image from the AM4113T (converted to jpg but otherwise unmodified):

A108 - 20150401_200212

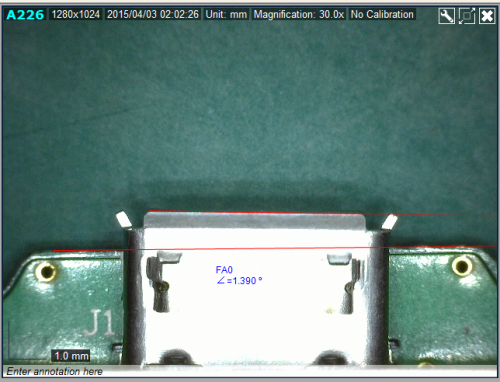
The included Dino Capture software is surprisingly usable and allows you to take instant snapshots and videos and make a number of measurements and annotations directly within the tool (only supported on the more expensive Premier series).  This is super handy for field work.  For example, here’s a measurement of the angle of a USB connector relative to a PCB edge.

Capture


The USB 2.0 interface is fast and responsive which makes the critically important live preview (there is no viewfinder) a pleasure to use. There is a handy touch-activated sensor on the side of the scope for quick snapshots. (Pro-tip: mark which direction is “up” with a sharpie or you’ll get dizzy trying to orient the cylindrical scope every time you use it.)

Compared to more inexpensive USB microscopes, like the Andonstar OT-V1, the Dino-Lite offers significantly better image quality, one touch snapshots, a better focus mechanism, and better, more uniform illumination.

One disappointment is the very obvious rolling shutter, which is particularly annoying when the microscope is being used to make measurements without a stand. At this price point, I would have expected a sensor with a global shutter. Despite this limitation, the Dino-Lite AM4113T is still a very useful tool and has already helped me make some critical measurements in the field.

Cool Tools: Design Easy SMD Component Kits

Introduction

Inspired by Kevin Kelly’s book Cool Tools: A Catalog of Possibilities, I have set out to document tools that I find particularly interesting or useful, primarily in my work as an electronics hobbyist and professional electrical engineer. This is the first post in that series.

Design Easy SMD Component Books

Design Easy SMD Kit

These SMD component books are super handy for all sorts of electronics prototyping, construction, and repair projects. I bought a full set of these books for my lab bench at the office some time ago and and have found them invaluable. I liked them so much that I bought a second set for home!

R0402 kit detail

I prefer these component books over other types of SMD kits such as trays, bins, drawers, or bags because they don’t take up much space on the shelf and they keep components nicely organized in order by value.  Components are easy to access and hard to mix up.

There are many other vendors on eBay and aliexpress that sell component books just like these, but I like Design Easy because they have reasonable prices and carry resistor and capacitor assortments from size 1206 all the way down to 0201. You can save on shipping by ordering a complete set at once.

Here’s a snippet from their eBay store:

0402 practical book: ( resistor 63value 3300pcs )+( capacitor 17value 950pcs )
0603 practical book: ( resistor 63value 3025pcs )+( capacitor 17value 700pcs )
0805 practical book: ( resistor 63value 3025pcs )+( capacitor 17value 700pcs )
RF practical book:    ( 0402 capacitor 12value 600pcs ) + (0805 capacitor 10uF 50pcs ) + (0402 high F inductor 38value 1900pcs)
0201 resistors: 106 values, 50 pcs/value, 5300 pcs in all
0402 resistors: 170 values, 50 pcs/value, 8500 pcs in all
0603 resistors: 177 values, 50 pcs/value, 8850 pcs in all 5%
0603 resistors: 170 values, 50 pcs/value, 8500 pcs in all 1%
0805 resistors: 177 values, 50 pcs/value, 8850 pcs in all 5%
0805 resistors: 170 values, 50 pcs/value, 8500 pcs in all 1%
1206 resistors: 170 values, 50 pcs/value, 8500 pcs in all

0402 capacitors: 80 values, 50 pcs/value, 4000 pcs in all
0603 capacitors: 90 values, 50 pcs/value, 4500 pcs in all
0805 capacitors: 92 values, 50 pcs/value, 4600 pcs in all
1206 capacitors: 38 values, 50 pcs/value, 1900 pcs in all

Their “practical book” series contains an assortment of SMD resistors and capacitors in one book, while the separate resistor and capacitor kits are more complete and IMHO generally more useful, particularly if you use capacitors a lot and need a wider assortment of values.

Bonus: If you want to create your own component assortment or add extra pages to an existing one, Adafruit carries Blank SMT Storage Books and extra Storage Pages.

Arduino Oops!

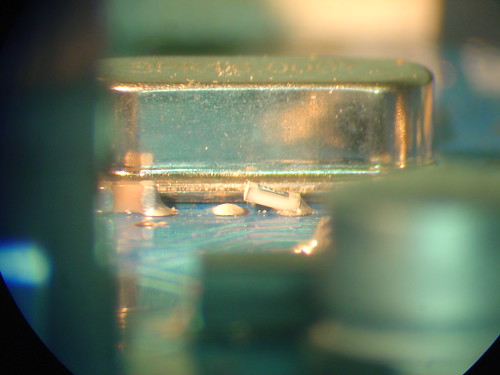
Closeup side view under the microscope

That’s a closeup of resistor R1 on my new Arduino Uno board.  See how the left terminal isn’t touching the solder bump on the land pad?  That’s not good.

Surprisingly, my Arduino seems to work just fine with one side of the resistor open.  Arduino, don’t let the cost reduction guys see this one, or they’ll eliminate it in the next rev!

More photos of the tombstoned resistor on my Arduino Uno.

The Arduino team has responded to other claims of manufacturing defects (most of which seem fairly trivial) in their blog post “One bad Arduino doesn’t spoil the barrel“. I have already contacted my reseller and will do everything possible to help Arduino improve their manufacturing process and quality control.

Improvements to my microscope setup for SMT work

Why do I need a microscope for SMT?

The single biggest challenge to doing “real” SMT work (0805 or smaller components and fine lead pitch ICs) at home is being able to actually see what you are doing.  I know that there are many hobbyists (and maybe even some budget-conscious professionals) who will disagree with me, but I wouldn’t dream of working with surface mount components without using a microscope.  I’ve tried many alternatives, including a 10X handheld triplet loupe, a magnifier ring light, even a nausea-inducing magnifying visor, and none of these even come close.

In case I haven’t made myself clear: I would rather solder SMT’s with a 150W soldering gun than with anything other than a decent stereo microscope.

In January of this year, I scored a stereo zoom microscope on eBay.  While my scope is far from state of the art (it’s a “vintage” American Optical model 569) the optics are fantastic and it quickly became the most prized piece of equipment in my shop.  Here’s a photo of the scope shortly after I added it to my lab, for more photos and information about it, see my original post.
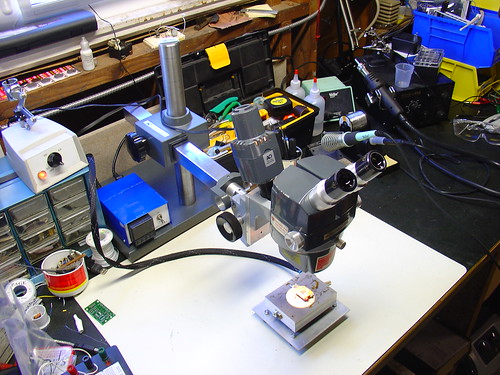
Stereo Zoom Microscope

For the first few months, I used the scope pretty much as it arrived.  One of the first major tasks I used it for was assembling the first batch of AVR HV Rescue Shields, and for this purpose it worked extremely well.  However, as time went on, it became clear that I needed to improve my setup in a couple areas:

  1. The magnification range of 7-30X was great for working on a few tightly grouped 0805 or smaller components, but was too high for general PCB work.  A typical BGA package was larger than the field of view.
  2. The included incandescent projector-style illuminator (shown piggybacked on the scope in the photo above) could only be placed in a limited set of positions and did not have adjustable focus – it made a nice, bright spot in the center of the image that didn’t fully illuminate the field at low zoom levels.  While it is removable from the scope (this provides a workaround for these issues), the included stand took up too much bench space to be practical.

Upgrading the microscope:

The first upgrade I made was to add a secondary objective aka barlow lens to the scope.  A secondary objective serves to increase or decrease the total magnification of a microscope, while simultaneously trading off working distance, the distance between the bottom of the microscope and an object in focus on the bench.  In my case, I added a 0.5x secondary objective, which gave me half the magnification while increasing my working distance by approximately 2x.  While American Optical stopped making accessories for the StereoStar 569 long ago, Reichert, who acquired AO’s microscope line, still sells parts and accesories, including the #575 0.5X secondary objective, shown below.
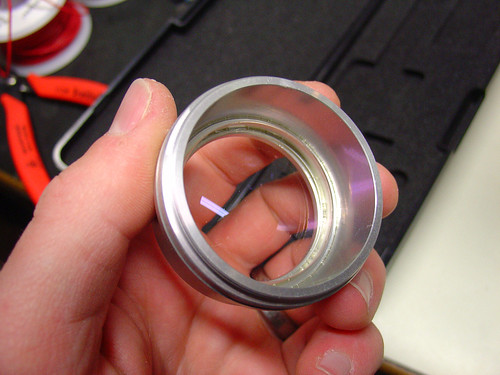
Supplementary Objective

The secondary objective screws into the existing threads on the bottom of the microscope.  Here it is installed on my scope:
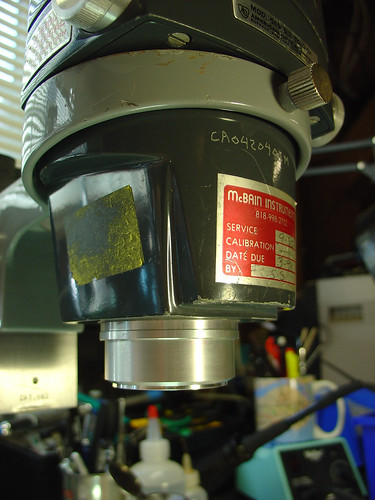
Secondary objective installed

Now with the secondary objective installed, I have a zoom range of 3.5-15X and a working distance of 6-8″.  If I need higher magnification, I can always remove the lens.  Perfect!

The second upgrade I made was to add a fluorescent ring light to the scope.  I picked up the cheapest one I could find on eBay.  This model is sold by Amscope, outputs 8W, and is available for under $30:
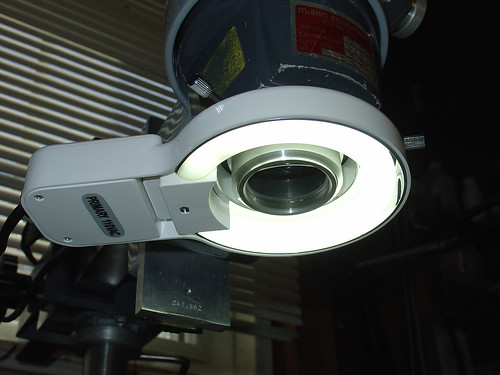
Fluorescent ring light

The ring light conveniently attaches to the newly installed secondary objective by tightening three thumbscrews, and provides a decent amount of light that fully illuminates both the object I’m working on as well as the surrounding workbench area, which has been surprisingly helpful.   Best of all, the new light stays out of the way and provides more even illumination than the halogen projector that came with the scope.

Here’s a photo of the microscope setup as it looks today:
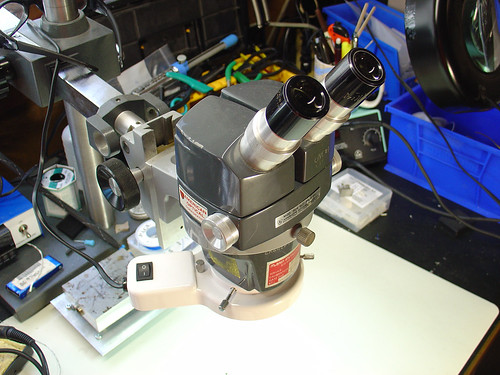
New microscope illuminator setup

Conclusion:

While the changes I made are significant improvements over my original setup, I have made a few observations that may lead to even more tweaks and upgrades in the future:

  • The increase in working distance due to the 0.5x secondary objective is great, but it puts the scope significantly higher above the bench.  I didn’t appreciate that this could be an issue until I had to buy a taller lab chair to see through the eyepieces!  I’m not sure how to work around this, but it’s good to be aware that more working distance isn’t always a good thing.
  • The color temperature of the fluorescent ring light is very poor (cool) compared to the halogen illuminator it replaced.  This gives everything a slightly depressing blue cast and is far from a true color representation.  Most noticeable are tantalum caps, which go from bright orange in color to a sort of slightly orange-ish dark grey under the scope.  Yuck!
  • Ring lights can create pretty nasty glare.  This might be a side effect of how I have the ring light mounted or the distance to the bench.
  • The 8W fluorescent lamp is ok, but more light would be better.  Fluorescent ring lights are nice and cheap, but better performance can be achieved with a significantly more expensive fiber optic illuminator.  I may look into getting one of these in the future.

Despite these minor issues, I am pretty happy overall with the new setup even after a couple hundred hours of heavy use.