Dorkbot-SF is meeting tonight at the Retox Lounge.
Topics include Laser Cutting Things, Touchscreen Video Controllers, and Space Tourism.

Dorkbot-SF is meeting tonight at the Retox Lounge.
Topics include Laser Cutting Things, Touchscreen Video Controllers, and Space Tourism.

The full lineup and schedule for the 2008 Blip Festival is now available. The festival takes place in NYC a little over a week from now, on December 4th-7th.
From the festival site:
Highlighting the chipmusic phenomenon and its related disciplines, the festival aims to showcase emerging creative niches involving the use of legacy video game & home computer hardware as modern artistic instrumentation. Devices such as the Nintendo Entertainment System, Commodore 64, Atari ST, Nintendo Game Boy and others are repurposed into the service of original, low-res, high-impact electronic music and visuals — sidestepping game culture and instead exploring the technology’s untapped potential and distinctive intrinsic character.
The Blip Festival assembles nearly 40 practitioners selected from the chip music movement’s expansive global underground, taking care to represent as many as possible of the genre’s surprisingly diverse styles, geographical and technical scenes, communities, and traditions. The festival’s concert program will be supplemented by daytime events to be announced, including workshops, presentations, and screenings. The Blip Festival’s intended result is to provide a cross-section of a movement currently in explosive flux, teeming with artistic exploration, and poised at the cusp of global awareness.
As a child of the 80s, I was exposed to the 8-bit sound first through video games on the Commodore 64 and the Nintendo Entertainment System, and much later through the vibrant chiptune scene that surrounded the Commodore Amiga computer. I distinctly remember loading games on my C64 just to hear the music – it wasn’t unusual for a game to have music than graphics or gameplay. Years later, I’m not sure if it’s because 8-bit music was ahead of it’s time or that electronic music today is embracing a more raw low-fidelity sound, but I still find the 8-bit sound fresh and interesting. Certainly it does have something to do with the many talented chiptune artists that have chosen to exploit the 8-bit sound in ways that remind me of the old but are also completely original and new.
(By the way, the C64 is even now playing a hidden role in popular music – see the Timbalands controversy and the Sidstation, used most notably in Fischerspooner’s Emerge and Kernkraft 400’s Zombie Nation.)
If you can’t make it to the Blip Festival, one of the best introductions to 8-bit music is the 8-Bit Operators album. The album features 15 covers of Kraftwerk by 8-bit artists and gives you a taste of a few very different approaches to the 8-bit sound. Also check out the Gamewave Podcast, which often features artists that have performed at the Blip Festival in previous years, many of which will return in December.

The vintage telephone speaker I used for my Bluetooth Handset project has a mysterious component wired across it’s terminals, as shown above (it’s the black cylinder with two leads on the upper left). The component measures as an open circuit on my DMM, but obviously it has some hidden function.
So far my guesses are:
I found a schematic at the Bell System Memorial that shows a symbol for the device, but I don’t recognize it.

Does anyone know what this thing is and what it’s for?

The latest from ctp @ snarkymcf.com.
Kylie recently gave me an old, broken Motorola HS820 bluetooth headset. The headset suffered from a defective microphone that resulted in extremely low volume on outgoing audio, even though everything else worked fine.
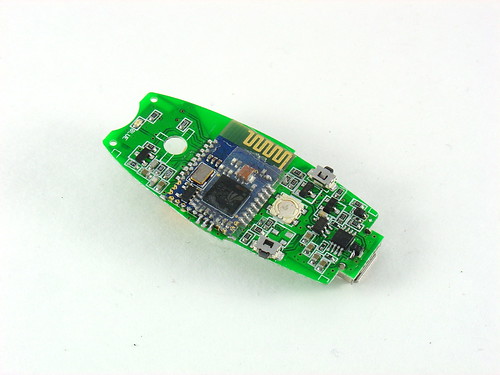
Upon receiving it, I proceeded to rip the headset apart, interested to see what was inside. I found a fairly simple PCB with a discrete bluetooth module in the center. The PCB is not labeled, but given that this is an older headset (3-4 years old) most of the connections are large enough to attack with a pencil iron and solder wires to.
This headset was begging for a project.
On my last trip to Weird Stuff, I came across the beauty shown below. The instant I saw it (and three other boxes full of others like it) I knew exactly what I was going to do with the broken headset: make it into a Bluetooth Handset instead.
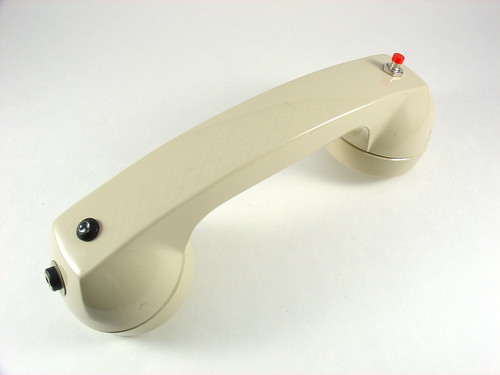
Shown below is a vintage International Telephone & Telegraph telephone handset. ITT manufactured phones in the 60s and 70s; later they spun off that part of the business to Alcatel and then got into some trouble with the government in 2007.

The handset has some heft to it and feels great to use. It is amazing how accustomed we have become to using extremely ergonomically poor cellphones. Just compare the shape and size of a modern cellphone to a handset like this and you can understand why it is so refreshing to pick up and use one of these.
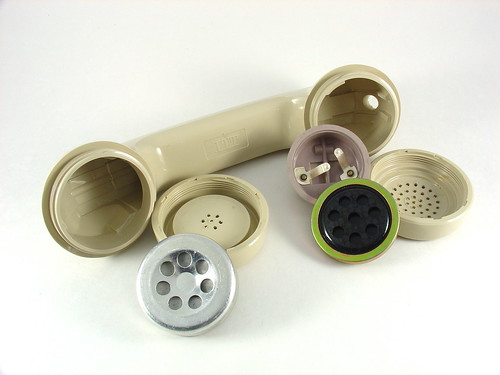
They don’t make them like this anymore. Unscrewing the faceplates reveals a speaker and a microphone which falls out onto the floor if you’re not careful. I remember phones like this when I was very young but hadn’t seen one in years.
Sticking the guts of the HS820 into the handset was not that difficult or time consuming. The speaker works as-is. It turns out the impedance of the speaker that came with the bluetooth headset is around 30 ohms, while the vintage handset speaker is 42 ohms, close enough. The audio quality is excellent!
The original microphone on the HS820 was an electret, which is not the same as the carbon style on the handset. Despite this, I was able to get the microphone on the handset to work by adding a 1k series resistor and wiring it to the same terminals on the headset as the original. Without the resistor, my voice was too loud and distorted. The value took some experimentation and I may continue to play with it, or eventually give up and install a modern electret style mic instead (but the original is just too cool).
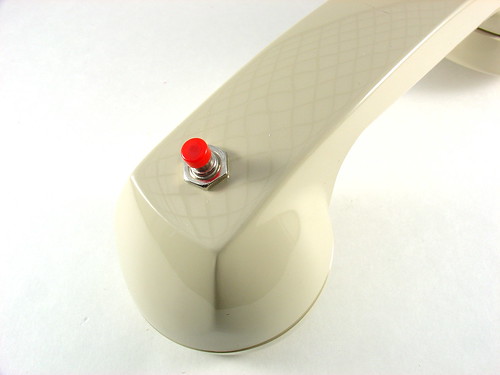
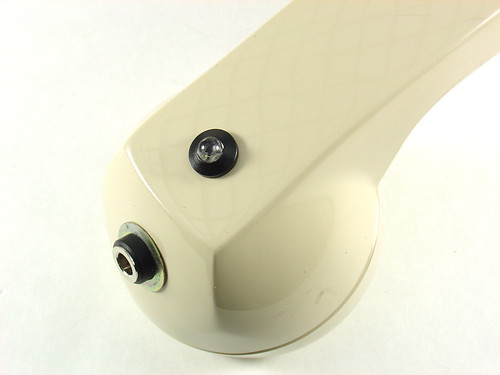
I added a pushbutton to replace the multifunction button on the headset. Holding down this button turns the handset on and off. Pushing it answers calls and probably does other stuff that I haven’t played with. The headset has volume buttons too, but the volume can be controlled via software so I didn’t wire them up to anything.
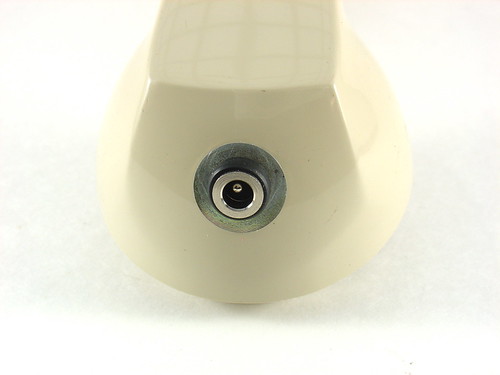
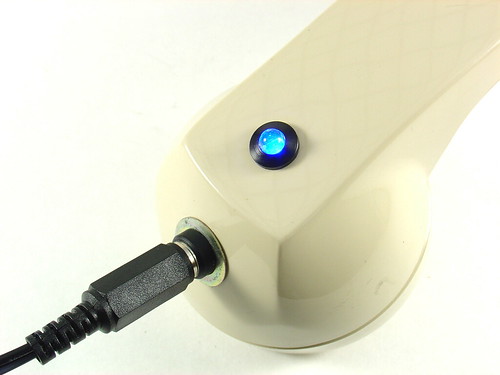
I also added a charging jack where the cord originally was. The washer is needed to fill the relatively large opening for the cord.
A ridiculously bright blue LED is wired in place of the status LED on the headset. I found the LED holder in my junk box.
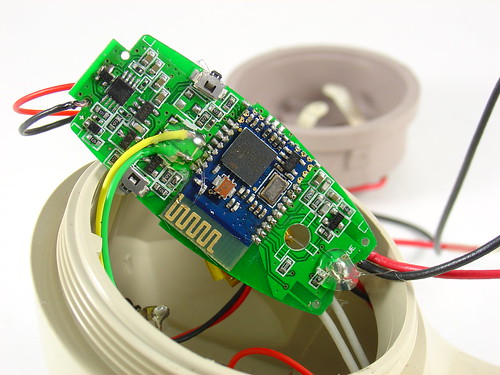
This shows the connections for the pushbutton (yellow and green wires in the center) and the LED (red and black in the bottom center). I removed the original pusbutton with my hot air rework station and soldered the new wires in place, then put a dab of hot glue on top to keep them in place. The big blue thing in the middle is the bluetooth module. I imagine that modern headsets do not have a discrete PCB for this. The HS820 PCB tucks inside the center of the handset when installed and stays in place without any special mounting.
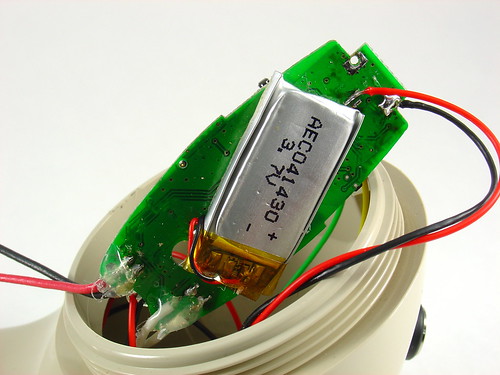
The other side of the HS820 PCB shows the 3.7V lithium battery and the connections for the microphone (lower left), speaker (lower right) and charger (upper right). The battery is glued to the PCB.
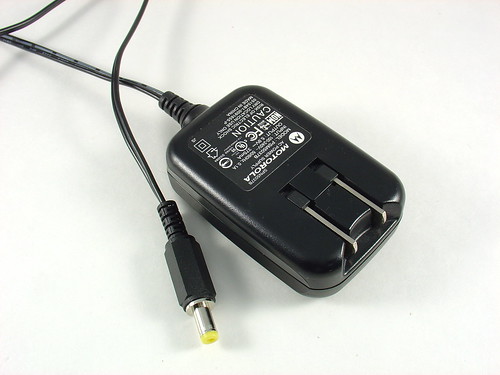
I modified the Motorola charger that came with the headset by cutting off the original 3 pin plug and replacing it with a 4.7mm power connector to match the jack on the phone. The third pin of the original connector wasn’t being used anyway.
To charge the handset, you just plug in the charger. The LED lights up to show that the handset is charging and goes out when it’s done. It flashes during normal use, blinding spectators.
I’m planning to use this for Skype on my desktop computer, but I may just have to carry it around for a few days to see what other people think of it…
Update: As mentioned in the comments, these are for sale at ThinkGeek.com, search for “retro handset”.
Update 2 (11/20/09): Welcome, Make: readers! Questions about this project? Head over to the forums for help!
