Tag Archives: sparkfun

Simple fix for Bus Pirate power supply oscillations

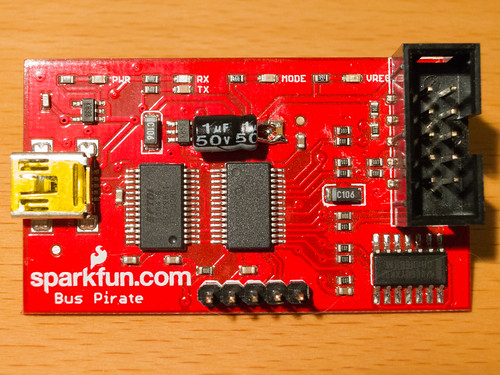
Modified SFE Bus Pirate

I picked up this Sparkfun Bus Pirate a couple years ago (thanks to Free Day!) It sat in a box for most of its life until recently I needed a simple way to interface a PC to an I2C device at work.  Out came the Bus Pirate.

I’m fortunate to have an Agilent MSO-X 3000 series scope at the office. This scope includes I2C decode capability on both analog and digital channels. I had been having some trouble with corrupt data coming in on the digital channels, so before connecting the Bus Pirate I switched to using analog channels 1 and 2 to decode I2C clock and data instead.

After sending a few test packets with the Bus Pirate, I noticed something weird – the logic high level had a tiny sawtooth waveform riding on it. Not good.

I zoomed in and saw something like this:
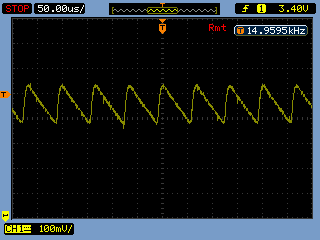
without cap

That 15kHz sawtooth is almost 150 mVpp!

After removing my device under test, I quickly narrowed the problem down to noise on the Bus Pirate’s 3.3V rail. I initially suspected that this might be some kind of noise coming from the 5V USB supply, so I added an additional 10uF cap in parallel with the 1uF already on the board (C1). The sawtooth increased drastically in amplitude and went down sharply in frequency. That’s when I realized that this wasn’t noise, it was a power supply oscillation.

The Bus Pirate uses a Micrel MIC5025-3.3YM5 regulator (VR3 in this schematic) to create the 3.3V rail from USB’s 5V. In the datasheet, there is a familiar warning: “Ultra-low-ESR capacitors can cause a low amplitude oscillation on the output and/or underdamped transient response.” The Bus Pirate uses a ceramic cap for C1, I’m not sure of the type but it could easily be NPO/C0G and quite low ESR. Adding another 10uF ceramic cap lowered the ESR (and SRF) of the parallel combination, bad news for supply stability.

Realizing that low ESR of ceramic caps was likely part of the problem, I took a different approach. I went around the lab and found the crappiest cap I could find, a 1uF/50V electrolytic, and put that across C1 instead.

After adding the new cap, this is what the 3.3V rail looks like:
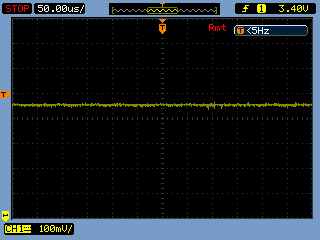
with cap

No more oscillation. This is with the original C1 still in place (see the photo at the top).

I don’t think Sparkfun has changed the design of their Bus Pirate clone in the years since I purchased mine, so if you’ve got one of these on your bench, throw a scope on the 3.3V DUT supply (after enabling it) and see what you find. You might be surprised.

Unless I am mistaken, a very similar regulator & bypass cap is used on all Dangerous Prototypes v3 and v4 Bus Pirates (including clones), so this is something to watch out for on any Bus Pirate on the wild.

Wifi Radio Cost Breakdown

Many people have asked me for a cost breakdown of my Wifi Radio project.  Well, here it is!

I added a link to possible sources for as many parts as I could.  However, there were a few things I scrounged from local surplus electronics stores and couldn’t easily find a good equivalent online.  I’m not expecting everyone to copy my design exactly (not everyone has a woodworking shop at their disposal), so use these numbers as a rough estimate only.

If you shop around you should be able to beat the listed prices on many items, so I see this as sort of a worst case scenario.

To flash the wireless router and create a minimal radio (with no user interface), you will need:

Total: $65.48

To make the LCD display and tuner interface, you’ll also need:

Total: $52.06

(This is on the high end, the interface can certainly be built for less by using scrounged/surplus components.)

To make the finished radio, add:

  • Volume and tune knobs – ~$2 @ HSC
  • Cool tuner knob$8.55
  • 5V/12V power supply brick – $10 @ Weird Stuff
  • 5-pin mini-DIN power connector – ~$3 @ HSC
  • Power switch – ~$1 @ HSC
  • Cheap set of PC speakers (gutted for the speakers and amplifier) – $5 @ Weird Stuff

Total: $29.55

Oh yeah, and I almost forgot…

  • An awesome friend named Tony with a full woodworking shop in his garage who will make you a killer wooden enclosure for free – $priceless

Grand total (excluding the box) – $147.09

If you take out the cost of the development tools, namely the FTDI cable and the USBtinyISP, the total comes out to $105 (without the box).

By scrounging materials and using parts from your junkbox you should be able to reduce that figure even more, but obviously the grand total hinges on what kind of enclosure you use.  Not everyone has a friend with serious woodworking skills willing to donate time and materials, but use this as an excuse to get creative.

I wanted a box that showcased the time and effort that I spent on the electronics inside, but that doesn’t mean an old boombox from the Salvation Army couldn’t work just as well.

When I first started this project, my goal was to keep the total parts cost under $100.  On paper, it looks like I came pretty close to that, thanks to the donated box and excluding the reusable development tools like the FTDI cable and AVR programmer.  To be honest, I probably spent twice that amount on spare power supplies, extra knobs, a second router to bring to NOTACON, and a bunch of other stuff that I didn’t end up using in the final project.  But I’m pretty ok with that.  I think this just highlights the fact that:

If you just want a Wifi Radio, it will always be cheaper to buy one off the shelf. But if you make your own, it will be infinitely more rewarding.

It certainly has been for me.  🙂