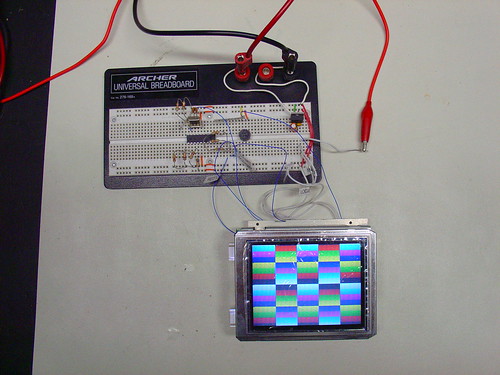
All posts by Jeff

Electrical engineer, tinkerer, maker.

DIY Light Tent

Homebrew Light Tent

I have always struggled to take decent macro photos of small objects to document my hobbies.  I finally got fed up with poor lighting and blurry shots and decided to build my own light tent to solve the problem.  There are lots and lots of examples on the web showing how to build a DIY light tent.  I wanted something cheap, small, and portable, so I merged ideas from a couple existing designs and used some scrap materials I had in the garage.  In the end I managed to make a light tent for about $35.

The major components are:

  • Light. I bought two desk lamps at Target for $9.99 ea.  I bought 100W CFL lights from Home Depot to avoid the unwanted heat and energy usage of conventional light bulbs, $9 for two.  I bought the color balanced type (3500K) which cost a little more but help accurate color reproduction in the photos.
  • Frame.  I used an old shoe rack, but almost anything can be made to work.
  • Light diffuser.  I tried bedsheets, which attenuated too much of the light.  Instead I used tracing paper (vellum) that I had left over from another project.
  • Background.  I used poster board from Target.  I bought one sheet each of 6 colors, for about $5.
  • Tripod – I didn’t have one so I bought the cheapest one Best Buy had, around $30.  Since I needed this for general use anyway, it’s not included in the total.

The results are really spectacular.  Now I can take macro shots of small objects without the glare and lighting problems I have experienced in the past.  For an example check out the photo below or see the complete set on flickr.

playing with my new light tent

New Flickr group for photos of printed circuits

U1405

Printed circuit boards can be interesting and beautiful, with their delicate traces and colorful components in all shapes and sizes.  I just created a new Flickr group for photos of printed circuits like the one shown above.  More details about the group can be found on Flickr:

Photos exploring the beauty of printed circuit boards and components, including both surface mount and through-hole PCB construction.

http://flickr.com/groups/pcb/

PID Controlled Solder Paste Fridge

PID Controller closeup

I recently decided I needed to upgrade my garage electronics bench to include capability to work on surface mount components.  I ordered a hot air reflow station and some no-clean solder paste from SRA.

Solder paste is a little tricky to handle, because most solder paste needs to be refrigerated at 32-50°F to maintain it’s shelf life.  Stored at room temp, it tends to get tacky and dry out within a few weeks.  Solder paste is also toxic (it contains lead among other things) so it’s not something you want to put in the fridge with your meatloaf.

I had an old beer cooler sitting in the garage that Kylie picked up on the street a while back.  It uses a Peltier thermoelectric cooler to cool the inside and can achieve sub-freezing temperatures.

PID Controlled Solder Paste Fridge

Since I didn’t want to leave the cooler on constantly, and below freezing is actually too cold for solder paste, I decided to add a PID controller to the cooler to create a solder paste fridge for the garage.  To do this, I needed the following items:

  • Love Controls 16A PID Controller found at a surplus store.  This one happens to run on 12V and also has a 15V output which made things simple, but other configurations are possible and almost any PID controller should work provided it supports “direct” mode (for cooling instead of heating) and has a relay or switched voltage output.
  • K-type thermocouple to measure the inside temperature of the cooler
  • power MOSFET capable of switching 12V @ at least 5A, lower on-resistance is better.
  • 1k bleed resistor to ensure the MOSFET turns off when it’s supposed to
  • a small heatsink for the MOSFET (may be unnecessary, mine doesn’t even get warm)

Since the PID controller happens to run on 12V I was able to use the existing 12V power supply for the cooler to power everything.  I configured it so that if the desired temperature is below the current temperature, the PID controller turns on the MOSFET which supplies power to the Peltier cooler and it’s associated fans.

The only hangup I had was that at first I didn’t place the 1k resistor across the output of the controller, and the cooler would stay on constantly.  It turns out that because MOSFETs have almost no gate current, once the PID controller turned off it’s 15V output, the gate of the FET would continue to float high.  The bleed resistor to ground ensures that this can’t happen, and the FET turns off properly.

Here’s a picture of the finished solder paste fridge complete with PID controller (click for a larger version).

Finished PID Controlled Solder Paste Fridge

You can check out a bunch more photos of the cooler on flickr.  It should be possible to perform this modification on a more conventional mini-refrigerator as well for better control over the temperature, provided it uses a Peltier cooler, or maybe you could even build the whole thing from scratch using a Peltier cooler off ebay.

Learn how to make a wiring harness

“Wiring harnesses are an essential and often overlooked part of any electrical system. On a car, a good wiring harness can make the difference between a weekend joyride and a long tow home. Building a quality wiring harness requires a couple inexpensive tools and the right techniques…”

The Maker Faire is an event held twice a year (alternating between San Mateo, California and Austin, Texas) by the folks at Make Magazine, one of my favorite publications from O’Reilly. The event centers on DIY culture, covering everything from making combat robots to felting and needlepoint.

This year I participated in the 2008 Bay Area Maker Faire in San Mateo and showed people how to make better wiring harnesses for things like cars and electronic projects.

During the Maker Faire I handed out a one page tutorial with information about where to buy the tools and supplies as well as the steps needed to create a template and make a wiring harness from scratch.

Here is a pdf version of the  handout.

Or grab it in .png format, click on the image below for a full size version.

Learn how to make a wiring harness!
Make Professional Quality Wiring Harnesses

Check it out and let me know what you think.

The Last HOPE

This past weekend, I attended The Last HOPE at the Hotel Pennsylvania in NYC.  The con was awesome and I had a great time.  This was my first HOPE, and I noticed a few strong themes this year, including:

  • Hardware hacking is getting a lot of attention and there is a lot of interest in microcontrollers including new design and reverse engineering off the shelf hardware like RFID.
  • Local community based physical spaces for hacking are booming.  Hackerspaces like NYC Resistor and the Hacktory are becoming a very big part of the scene, and new hackerspaces are popping up all over the world.  Each space has their own unique interests, but common themes seem to be microcontroller hacking (especially Arduino), fabrication (like Reprap and Fab@Home) and other more physical projects instead of just writing code.  There was even a new wiki announced at the show that is devoted to tracking hackerspaces and helping start new ones at hackerspaces.org.
  • There was an awesome talk about Biohacking by Chris Seidel (I wish I could find a link) that makes me wonder if we will see more of this in the future as Bioengineering becomes more accessible to the masses.  The parallels Chris identified between biological processes and electrical circuits were spooky.

It was announced during the closing ceremonies that the Hotel Pennsylvania will not be demolished as was previously announced, and that there will indeed be another HOPE in 2010.

NYC Resistor has some info about the 3D Wiremap demo, one of my favorite exhibits, shown below.

3D Volume Renderer