Category Archives: Projects

Building a Wifi Radio – Part 4, Installing OpenWrt

This is the fourth part of an ongoing series about building a low cost, open source streaming internet radio.  If you haven’t already, check out parts one, two, and three for some background about the project.

At this point you should have an Asus WL-520GU wireless router with a serial port header installed and some way of communicating with the serial port from your PC.  If not, go back to part three.

What is OpenWrt?

According to openwrt.org:

OpenWrt is described as a Linux distribution for embedded devices.
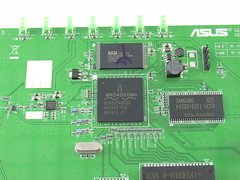
OpenWrt replaces the stock firmware on the WL-520GU with an open source Linux distribution that aims to be extremely powerful and flexible.  This is important for us because in turning a wireless router into a Wifi radio, we using the device in a way that the manufacturer never intended for it to be used.  In addition to including a stripped down version of the Linux operating system, drivers for wireless networking and all the basic functionality of a residential network gateway, a package manager called opkg allows you to install a wide variety of add-on modules to extend the functionality even further.

Setup:

To install OpenWrt on the WL-520GU you will need a few things:

  • Your Asus WL-520GU wireless router, modified to allow access to the internal serial port
  • A 3.3V USB-serial cable like the FTDI-232-3V3
  • A short ethernet cable (a crossover cable is not required)
  • A desktop or laptop computer with an open USB and ethernet port
  • A terminal program such as ZTerm or Hyperterminal
  • A TFTP client, (surprisingly) included with most operating systems.  I’ll be using the one included with OS X.
  • A WiFi network with a reasonably simple encryption scheme (ie. none, WEP, WPA)

If you want to compile your own OpenWrt image and optional packages, you’ll also need

  • A machine running Debian or similar Linux operating system, or if you are really ambitious, a Mac running OS X.  I won’t cover compiling OpenWrt using OS X here, but there are several issues that prevent it from being straightfoward, the first of which is that OS X does not use a case-sensitive filesystem by default.

Note: If for any reason you need to go back to the stock firmware, you can download it from Asus here (enter WL-520GU into the search field on the left).

Getting OpenWrt:

There are two ways to do this:

The hard way:

Visit the OpenWrt Wiki and read the instructions on Installation.  Follow these instructions to build Kamikaze (Kamikaze is the current OpenWrt distribution).  Download the source with subversion (svn), and compile it yourself.  This method requires a moderate level of skill with Linux, but if you can compile your own kernel you should be able to compile OpenWrt.  You will need to link to the feeds for madplay, mpc, and mpd (as well as any other 3rd party packages you want) before executing make menuconfig, by using the scripts/feeds command.  Here is the sequence of commands I used, yours may differ slightly:

svn co https://svn.openwrt.org/openwrt/trunk/ ~/kamikaze
cd ~/kamikaze
./scripts/feeds update -a
./scripts/feeds install madplay mpc mpd
make prereq

If make fails, you may need to install some optional Linux tools, such as gawk, bison, or gcc.  On Debian I used the apt-get command to do this

apt-get install gawk bison gcc

Once you have all necessary prerequisites installed, you can configure the build with

make menuconfig

You’ll need to set the following options:

  • Target System (Broadcom BCM947xx/953xx [2.4])
  • Target Profile (Generic, Broadcom WiFi (default))
  • Select all packages by default
  • Image configuration —>
    • Base system (Added 12/18/08 to support part six)
      • busybox (press enter to open hidden menu)
        • Configuration
          • Coreutils
            • stty
    • Kernel modules
      • Sound support
        • kmod-sound-core
      • USB support
        • kmod-usb-core
        • kmod-usb-ohci
        • kmod-usb-audio
    • Sound
      • mpd
      • mpc
      • madplay

Once you’re done, exit, saving the configuration.  Then execute

make world

This will take quite a while.  If the build fails, you will be prompted to run make again

make world V=99

and fix any problems that occur, based on the error messages.  The OpenWrt forums are a good place to get help, but do a quick search before you post to avoid asking a question that has already been answered.

If the build completes successfully, you should be left with a bunch of files in the kamikaze/bin directory, including openwrt-brcm-2.4-squashfs.trx, the main image file, and a bunch of packages in the bin/packages/mipsel directory.

The easy way:

I’ve already done the hard work for you.

Download my precompiled openwrt-brcm-2.4-squashfs.trx image.

Addon packages (you’ll need a few of these when we configure the router later) are located here.

Installing OpenWrt:

Connect your FTDI cable to the serial port on the router that you added in part three.  Launch your favorite terminal program and connect to the router at 115200 baud, 8N1.

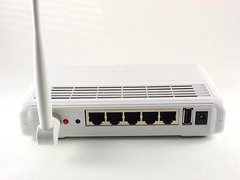
Connect the LAN1 port of the router to your computer using a short ethernet cable.  The router is hardcoded to be 192.168.1.1 on boot, and we need to configure our computer to talk to that address.  I set my Macbook to use a static IP of 192.168.1.185.  You may need to set a gateway to 192.168.1.1.  If your home network is also on the 192.168.1.x subnet, you will need to disconnect/disable it.  On my Macbook, this meant disabling the internal wireless and losing internet access while the router was connected.  (Eventually I got tired of this and moved my home network to 192.168.24.x, but that is outside the scope of this tutorial.)

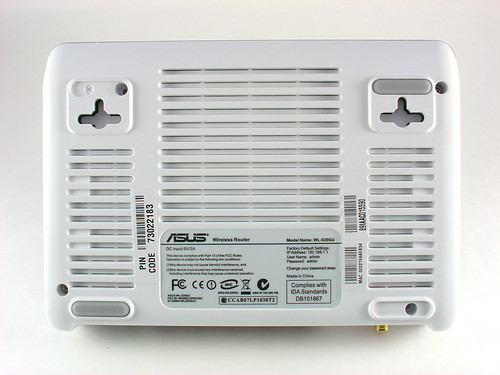
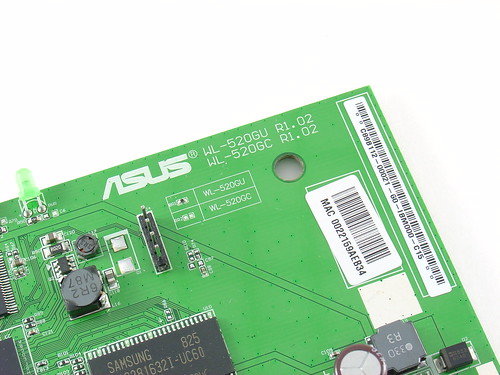
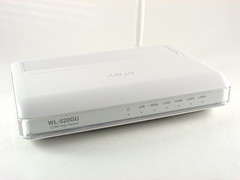
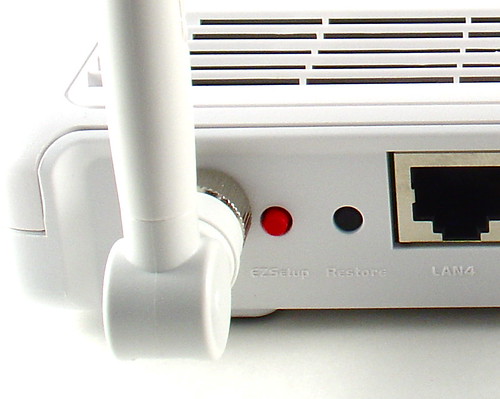
Press and hold the Restore button on the back of the router and plug in the power cable.  The Restore button is shown just to the right of the red EZSetup button here:

WL-520GU Restore Button Closeup

Continue holding the Restore button until the power LED starts flashing once a second.  Release the restore button.  In your terminal window, you should see some boot messages and then

Reading :: TFTP Server.
Failed.: Timeout occured
Reading :: TFTP Server.
Failed.: Timeout occured

and so on (the messages will repeat forever).

Now it’s time to transfer our .trx file to the router.  These instructions are for OS X.  Instructions for other operating systems are here.

cd ~/kamikaze/bin
tftp
trace
timeout 1
mode binary
connect 192.168.1.1
put openwrt-brcm-2.4-squashfs.trx

On the serial console you should see (exact numbers may vary):

Reading :: TFTP Server.
TFTP_BLKLEN!!
break!! last block!!
Done. 1918724 bytes read
Download of 0x1d4704 bytes completed
Write kernel and filesystem binary to FLASH (0xbfc20000)
Programming...
copysize=1918724, amtcopy=1918724

If you don’t see this, chances are your computer is not talking to the router.  Most likely this is a configuration problem with your ethernet port or you don’t have the cable connected to a LAN port of the router.

If it worked, wait a couple minutes (don’t touch anything, unplugging the router at this point could brick the router!)  Eventually you should see the message

done. 1918724 bytes written

After this message appears (it typically takes 3-5 minutes for the whole process) unplug the router, wait a few seconds, and then plug it back in again.  In your serial terminal window, you should see the Linux boot messages again, but the process will pause briefly while the jffs file system is created.  Once the router has finished booting, you’ll see a couple messages like this

mini_fo: using base directory: /
mini_fo: using storage directory: /jffs

Press enter and you should now see the OpenWrt banner and a shell prompt

BusyBox v1.11.2 (2008-10-02 20:59:06 PDT) built-in shell (ash)
Enter 'help' for a list of built-in commands.
  _______                     ________        __
 |       |.-----.-----.-----.|  |  |  |.----.|  |_
 |   -   ||  _  |  -__|     ||  |  |  ||   _||   _|
 |_______||   __|_____|__|__||________||__|  |____|
          |__| W I R E L E S S   F R E E D O M
 KAMIKAZE (bleeding edge, r12831) -------------------
  * 10 oz Vodka       Shake well with ice and strain
  * 10 oz Triple sec  mixture into 10 shot glasses.
  * 10 oz lime juice  Salute!
 ---------------------------------------------------
root@OpenWrt:/#

Congratulations!  You have successfully installed OpenWrt!

A complete log of the first boot is available here.

Configuring OpenWRT:

There is a lot of information on the OpenWRT Wiki with regard to Configuring Kamikaze, but I will walk through the fairly basic configuration I am using here.  To follow along, you will need to be comfortable using vi (if not, check out this quick reference card.)

You should be able to use your serial terminal to execute the following commands.  I had issues using the arrow keys to navigate in vi and had to use the basic movement keys instead (h=left, l=right, k=up, j=down).

Before we can get the router on a WiFi network we need to modify a couple files.

root@OpenWrt:~# vi /etc/config/wireless

You should edit this file to look like this (changes are in bold)

config wifi-device  wl0
	option type     broadcom
	option channel  2  # the channel your wireless network is on

	# REMOVE THIS LINE TO ENABLE WIFI:
	# option disabled 1 (comment out or remove this line entirely)

config wifi-iface
	option device   wl0
	option network	lan
	option mode     sta  # configures the router to connect to your network
	option ssid     MyNetwork # the SSID of your network
	option encryption wep  # the encryption mode of your network
	option key	XXXXXXXXXX  # add this line with your WEP key in place of X...X

Now we need to modify the networking configuration to use DHCP (this should apply for most people):

root@OpenWrt:~# vi /etc/config/network

Scroll down and look for the LAN configuration section, and edit it to look like this (note the dhcp option in bold, also comment out the last two lines as shown):

#### LAN configuration
config interface lan
      option type     bridge
      option ifname   "eth0.0"
      option proto    dhcp
      #option ipaddr   192.168.1.1
      #option netmask  255.255.255.0

Lastly, verify that resolv.conf is set correctly.

root@OpenWrt:~# vi /etc/resolv.conf

You should see the following line (this assumes the router will get a valid DNS server address via DHCP, if not, you can set it manually here):

nameserver 127.0.0.1

Then execute the following command:

root@OpenWrt:/# /etc/init.d/network restart

After a moment, if everything is working, the AIR light on the router should turn on and you should be able to ping some servers by name.

root@OpenWrt:/# ping www.google.com
PING www.google.com (74.125.19.104): 56 data bytes
64 bytes from 74.125.19.104: seq=0 ttl=240 time=20.113 ms

If you made it this far, congratulations!  You now have a working embedded Linux device on your WiFi network!

That concludes part four of this series.  In part five, I’ll cover installing addon packages using opkg.  If we’re lucky, we’ll get the router to play some tunes!

Update: Part five is now available.

Update 2: There is a new Wifi Radio Discussion Forum, hop over there to ask questions about the project or see what other people are working on!  (4/12/09)

Building a Wifi Radio – Part 3, Hacking the Asus WL-520GU

This is the third part of an ongoing series about building a low cost, open source streaming internet radio.  If you haven’t already, check out part one and part two for some background about the project.

Hacking the Asus WL-520GU Wireless Router:

In the last part of this series, I selected the Asus WL-520GU wireless router as a suitable embedded platform for my Wifi Radio project.  I have since posted some detailed specs on this impressive low-cost router, revealing it’s powerful Broadcom BCM5354 core, 4MB flash, and 16MB SRAM.  Granted, there are many more powerful routers out there that have USB support, will run Linux in various forms, and have built-in WiFi.  However, the WL-520GU does almost everything we need to build a streaming internet radio and costs under $50 (I have seen them for as little as $26 after rebate), which is very impressive indeed.

To convert this router into a powerful embedded system, we need to make a couple modifications.  First, we need to throw out the stock firmware. It turns out that this router, like many others, runs Linux from the factory.  However, because it was designed to be a wireless router and not much else, the stock firmware doesn’t include a very wide set of features (and certainly was not intended to be accessed by the customer).  Thankfully, there are several open source Linux distributions available that support this router, including my favorite, OpenWrt.  In addition, Asus has made it fairly straightforward replace the stock firmware with our own custom Linux build which can include all the programs, drivers, and utilities we can cram into 4MB of flash.

Warning:

Before we start hacking the router, there are a couple things I should mention:

  • From this point onward, your warranty is toast. Don’t even THINK about trying to send a modified router back to Asus for warranty service.  In the end it hurts people like us, because Asus will try to make it harder for people to perform the same modifications in future products.
  • You may inadvertently destroy your router. If you are not comfortable with the fact that a misstep during the reflash or a stray solder bridge could ruin your hardware, stop now.  Sorry.  If you really take a wrong turn, you could damage your PC as well, but this is extremely unlikely.  If you do somehow damage your router or PC doing these modifications, I assume no responsibility for any damages!

This tutorial assumes that you have already established the router is basically working by assembling it, plugging it in and checking for it’s wireless signal and internal webserver.  The user manual does a good job of leading you through this process, but don’t use the supplied CD – follow the advanced/manual instructions instead.

Accessing the internal serial port:

The OpenWrt install will be easier if we can find a way to access the internal serial port of the router.  The built-in serial port gives us a way to view Linux boot and status messages and get shell access as well.  The serial port will also come in handy later when we want to add a user interface to the radio.

You will need:

  • A desktop or laptop computer with an open USB and Ethernet port.
  • Your shiny new ASUS WL-520GU wireless router (R1.02)
  • A strip of breakaway 0.1″ male header
  • A FTDI-232-3V3 USB to serial adapter cable ($20 @ Adafruit) or some other means of connecting a 3.3V level serial port to your PC
  • A small scrap of perfboard and a strip of female 0.1″ header (not strictly necessary, see below)

-and-

  • A basic electronics workbench with ample light, a temperature controlled soldering iron, a solder sucker, solderbraid, wirecutters, and pliers.  Servo Magazine recently held a contest to see who could build the best electronics workbench for under $100, the results should be helpful for anyone just starting out.  If you’re uncomfortable soldering, find someone else to help you with this part at your local hackerspace.

Step 1 – Open the router

Remove the power cord and antenna (the base unscrews).  Flip the router over and look at the bottom.  You should see something like this:

Asus WL-520GU

Note there are four screws that hold the router together, two are hidden underneath the rubber feet.  The feet are stuck on really well, but persistent prying with a fingernail will get them off eventually.  Remove the four screws and set them aside.  The top cover should come off without too much trouble.

Now that the router is open, you should see something like this:

Asus WL-520GU Wireless Router

Step 2 – Add a serial port header

Remove the PCB from the plastic enclosure by gently pulling it up and towards you (ethernet ports facing away).

Just to the left of the ASUS logo in the photo below, you will see a 4-pin header that I have installed to access the internal serial port of the router, the router ships without this header.  Instead, you will see four solder filled vias in a row in the same spot.

You will need to use your soldering iron and a solder sucker to remove most of the solder so that the header can be installed.  A higher power soldering iron will help with removing solder from the first via on the left (mine is a 60W Weller WTCPT).  This via connects to a ground plane which sucks heat away from the iron and makes the job more difficult.  Be patient and persistent and you should be able to wick any remaining solder away with some soldering braid if necessary.

Break a 4-pin chunk of male header off the strip.  Pop the header into the board and carefully solder it into place.  If it doesn’t fit, chances are there is still some solder left in the vias.  You should end up with something like this:

WL-520GU serial port

The pin functions are, from left to right in the photo:

GND   TX   RX   3.3V

Step 3 – Connect your PC

The FTDI-232-3V3 USB to serial adapter cable provides a handy way to add a 3.3V TTL level serial port to a PC or laptop.  The cable has a flat connector on the serial end that can plug directly onto 0.1″ male headers like the one we are using on the router.  Unfortunately, the pinout of the FTDI cable (given in the datasheet) does not match that of the router.  To resolve this, you have two options:

  • Use a tiny screwdriver to pull out the pins from the housing at the cable and rearrange them.  Do not connect anything to the 3.3V pin on the router, and swap the TX/RX so that the TX on the router feeds RX on the cable, and vice-versa.  Don’t forget to connect the grounds!  The downside of this is that now you can’t use the FTDI cable for things like the Boarduino without swapping the pins back.

-or-

  • Fabricate an adapter board using a small piece of perfboard and some headers, shown below (click for a larger version):

Asus wireless router serial port adapter Asus wireless router serial port adapter

Here is a schematic of the adapter board:

Shown here are the cable and adapter installed on the router.  Make sure the ground side of the cable is connected to the pin on the header that is opposite from the fat angled trace (the 3.3V line).  Ground is the black wire, on my adapter I marked this with a black dot so I won’t forget and plug it in backwards.

WL-520GU with serial cable installed

Step 4 – Test the connection

Plug the cable into your PC (you may need some drivers) and open your favorite terminal program.  (I like Zterm for the Mac or Hyperterminal on the PC.)   Using the terminal program, open the serial port corresponding to the FTDI cable (something like usbserial-FTDQ23LB on the Mac or COM3 on the PC, but your setup may be different.)   Set the port options to 115200 baud, 8N1.

Connect the antenna and power supply to the router and plug it in.  You should see something like this appear in your terminal program:

Decompressing..........done
CFE version 1.0.37 for BCM947XX (32bit,SP,LE)
Build Date: Thu Mar  6 10:05:04 CST 2008 (root@localhost.localdomain)
Copyright (C) 2000,2001,2002,2003 Broadcom Corporation.
Initializing Arena
Initializing Devices.
Boot partition size = 131072(0x20000)
et0: Broadcom BCM47xx 10/100 Mbps Ethernet Controller 4.130.31.0
Total memory: 16384 KBytes
CPU type 0x29029: 240MHz
...

If you do, congratulations, your serial port is working!

The lines that scroll by are boot messages from the Linux kernel of the stock firmware on the router.  These messages give you a lot of information about the hardware in addition to information about the operating system and software drivers.  Here is a complete transcript of the boot log from my router.  If you wait a couple minutes for the router to finish booting and hit enter, you should see a command prompt.  From here you can explore and play around with the stock firmware, there is really not much to do here until we reflash the router with OpenWrt.

That’s it for part three.  In part four, I’ll talk about installing OpenWrt and connecting the router to your wireless network.

Update: Part four is now available.

Update 2: There is a new Wifi Radio Discussion Forum, hop over there to ask questions about the project or see what other people are working on!  (4/12/09)

Inside the SYBA SD-CM-UAUD USB Stereo Audio Adapter

SYBA SD-CM-UAUD USB Stereo Audio Adapter

I am using this tiny USB-audio adapter as part of my Wifi Radio project.  It’s a ridiculously cheap $8 at Newegg.com and contains a C-Media CM119 chip targeted at VoIP applications.  I have no idea why they chose to use a VoIP chip for this application because it contains a lot of bells and whistles that are not being used in this device, such as support for a matrix keypad!

SYBA SD-CM-UAUD USB Stereo Audio Adapter

Unfortunately, I have not been able to locate a datasheet for the CM119 so for now I will be using it only for it’s intended application – adding an audio output to a wireless router with USB.  Come to think of it, that is probably not it’s intended application, but it’s close enough.  Hooray for embedded Linux!

SYBA SD-CM-UAUD USB Stereo Audio Adapter

Detailed specs for the Asus WL-520GU uber hacking platform

Asus WL-520GU Wireless Router

In my previous post about the Wifi Radio project I’m working on, I concluded that the Asus WL-520GU wireless router was the perfect choice for an embedded wireless platform, thanks to its builtin 802.11g WiFi, Linux support, and extremely low cost. (In fact, the price after rebate has dropped since my last post – now would probably be a good time to buy one if you’re thinking about hacking it into something eventually).

Here are the specs on this router, based on an inspection of the hardware and the stock firmware Linux kernel boot log (the complete log is here).

  • CPU: Broadcom BCM5354KFBG SoC @ 200MHz (240MHz?)
    • Builtin 802.11g wireless transceiver
    • Builtin 10/100 ethernet switch
    • Core supports 2 serial ports, only 1 is available on the PCB (installed 4 pin header shown in photo above)
  • RAM: 16MB Samsung K4S281632I SRAM
  • Flash: 4MB MX 29LV320CB
  • One USB 1.1 port (USB 2.0 support is broken according to the folks at OpenWRT)
  • SiGe Semiconductor 2528L discrete RF Power Amplifier IC
  • One external TX/RX whip antenna (RPSMA), internal diversity RX antenna on PCB
  • Internal 3.3V DC-DC converter
  • PCB Dimensions: 4.0″ x 5.6″
  • Supply: 5V @ <2A

Here are some images of the PCB, click for a larger version.

Asus WL-520GU Wireless Router Asus WL-520GU Wireless Router

Here’s a closeup of the Broadcom BCM5354 SoC – the brains of the router.  It is surrounded by a 4MB MX flash chip above and a Samsung 4MB SRAM chip on the right.

Asus WL-520GU Wireless Router

Overall this is a great little router and an even better platform to build an embedded Linux system, provided you don’t need USB 2.0 support.  If you do, look at the WL-500gP v2 instead, it has two working USB 2.0 ports (in addition to much more flash storage and RAM).

Building a Wifi Radio – Part 2, Choosing an Embedded Platform

This is the second part of an ongoing series about building a low cost, open source streaming internet radio.  if you haven’t already, check out part one for some background about the project.

Onward…

In part one, I discussed the merits of streaming internet radio and the motivations for my Wifi Radio project.  Now it’s time to start looking at what hardware can make this project a reality.  Before we get started, let’s review the requirements list from last time.

Requirements:

  • Wireless connectivity through existing Wifi network
  • Audio output (preferably 44kHz, 16 bit stereo)
  • An integrated amplifier and speaker(s)
  • Shoutcast/MP3 streaming audio decode
  • Several builtin station presets
  • A display to indicate the station and currently playing song
  • Simple user interface, using standard radio controls (volume, tune, etc)
  • 110VAC operation

There are two additional requirements that I implied in the first post but forgot to include explicitly:

  • Cheap, priced below a commercial streaming radio – target < $100.
  • Small size so it can be portable (no desktop PC’s allowed!)

Selecting the hardware:

How do these requirements translate into hardware?  Let’s take a stab at what features we’d like in an embedded platform.

  • A wireless interface
  • Audio output
  • Sufficient system resources (CPU, memory, etc.) to decode MP3s
  • Some extra IO for a control panel and display
  • Low cost
  • Small size
  • Ease of development

The size and cost aspects pushed me towards an embedded system instead of a small form factor PC like any of Shuttle’s XPC offerings or a nano-ITX board.  To me, “Ease of development” equals Linux, so I wanted something well supported by Linux and an active open source development community.

There are quite a few embedded Linux platforms out there, with a wide variety of prices and features.  I looked at a few of them, including:

  • The Tin Can Tools Hammer – very impressive ARM9-based board with USB, lots of RAM and flash, lots of IO, and best of all the footprint of a 40-pin DIP package (breadboard compatible!).  No wireless and relatively steep pricetag ($160).


  • TI‘s Beagle Board – Incredible featureset including DVI output and a 600MHz ARM Cortex core.  No wireless and price is stunning for what you get, but overkill for this project ($150).  (Must keep in mind for future projects!)


    ASUS WL-520gU Wireless Router

  • Consumer wireless routers like the Asus WL-500gP v2 and WL-520GU – builtin wireless (yay!), USB, 240MHz Broadcom 5354 core, decent RAM and flash, cheap. Newegg has the WL-520GU for an incredible $26 after rebate (normally $50). The higher end WL-500g has more memory and flash and an integrated USB 2.0 hub (2 external ports).  Newegg has the WL-500g Premium V2 for $50 after rebate (normally $80). Both versions are a steal for what you get.

Tiny, under $50 and with built-in wireless, the Asus WL-520GU is the clear winner for this project.  The downside?  Since this router was never intended to do anything other than, well, route, we’re going to have to crack it open, modify it, and void the warranty.  In addition, there is no tech support and we’re going to have to spend some extra time hacking around to get it to do what we want.

Here it is in all it’s glory:

Asus WL-520GU Wireless Router Asus WL-520GU Wireless Router

Here’s a sneak peak of the inside:

Asus WL-520GU Wireless Router Asus WL-520GU Wireless Router

This router is supported by OpenWRT, an open source Linux distribution for small embedded devices.  Ignore the work-in-progress designation, it works, trust me!

Although the router lacks builtin audio, that is easily solved with an $8 SYBA SD-CM-UAUD USB Stereo Audio Adapter. There have been reports that the WL-520GU only supports USB 1.1 reliably, but USB audio doesn’t require USB 2.0 so it’s not an issue for us.  For full USB 2.0 support, look at the WL-500gP v2 instead.

So far we have $58 into the project ($38 if you are lucky enough to get the rebate) and we have an embedded Linux computer, a wireless interface, and an audio output.  Not bad!

That’s it for part two!  In part three I’ll install a serial port on the router and get ready to reflash the stock firmware with OpenWrt.  At that point we’ll be able to start listening to some tunes!

Update: I posted detailed specs for the WL-520GU and a couple more photos here.

Update 2: I posted some images of the $8 USB-Audio Adapter I am using as well.

Update 3: Part three is now available.

Update 4: There is a new Wifi Radio Discussion Forum, hop over there to ask questions about the project or see what other people are working on!  (4/12/09)