Tomorrow (Wednesday 9/10) the SF chapter of dorkbot is having a meeting at Million Fishes on Bryant St in San Francisco. Topics include Soft Circuits, the RIAA, and kinetic art.
For more information go to dorkbot-sf.

Tomorrow (Wednesday 9/10) the SF chapter of dorkbot is having a meeting at Million Fishes on Bryant St in San Francisco. Topics include Soft Circuits, the RIAA, and kinetic art.
For more information go to dorkbot-sf.
More progress using a PIC microcontroller to generate video. What next? Color is easy. Animations perhaps?
PS: If you start looking, these guys are everywhere.

Bre Pettis (formerly of Make Magazine’s Weekend Projects) is hosting a new TV show that premieres on the History Channel later this month.
I’m really excited. I just found out that my TV show pilot, called History Hacker is going to air on the History Channel on Friday, September 26th at 9PM. This photograph, which is also the current header of my blog was shot during filming of the show. I’m on set in my infinity workshop and that’s a decent sized Tesla coil.
Over the course of the show I learn about the inventors and inventions of the past and then hack the inventions together out of stuff in my closet.
History Hacker
Friday, September 26, 2008
9PM
The History Channel
Bre also has a new blog where you can check out what he’s up to, including his involvement with Etsy and uber-hackerspace NYC Resistor.
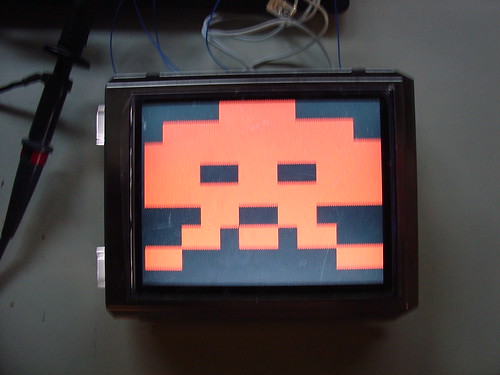
Here is a PIC16F628 microcontroller clocked at 20MHz generating an analog RGB video signal with composite sync.
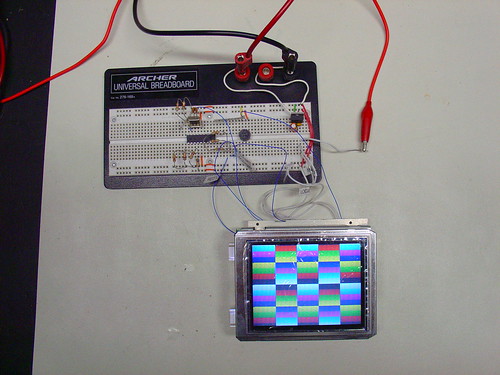
This project was inspired by Rickard Gunee’s PIC Video Howto which gave me a big headstart in writing the code. Thanks Rickard! I have been wanting to work on this project since reading the tutorial several years ago, and finally got a chance to start it last week.
There are few fundamental differences in my approach compared to Rickard’s and others I have seen in the past. His tutorial was written a few years ago before 20MHz PICs were commonly available (it uses an overclocked PIC16F84.) He also focuses on generating composite video to drive a standard television (using the AV inputs). I am generating RGB video which will interface with the Sharp LCD I had sitting on the shelf. RGB is a little different in that it uses a separate sync signal (composite horizontal and vertical sync on one inverted TTL line) and each color is brought out as a separate 0.7Vpp signal. These two differences make the RGB interface considerably easier (in my opinon) to work with, especially since the approach to composite video Rickard uses is limited to black and white.
So far the biggest challenges have been with getting the video timing right. I am writing the whole program in PIC assembly and every clock cycle counts.
More on this project soon, but until then, there are a few more photos on flickr.
How to Repartition Your Hard Drive (manually)
