Mitch Altman and I are in the process of writing a book about Making Cool Things with Microcontrollers (for people who know nothing.)
The book features several DIY projects that use AVR microcontrollers. We’re aiming to teach absolute beginners how to solder, basic electronics, and the process of turning a cool idea into reality by using microcontrollers.
I wrote these instructions about setting up a working avr-gcc environment in Windows, Mac OS X, or Linux. Mitch and I felt that they could use some beta testing in the real world before bring included in the book, so we decided to make them available here. We also felt that they might help some people get started with AVRs before the book is available.
We want to make the process of writing and compiling code for the AVR simple and accessible, so we’re not using any fancy IDEs (eg. no AVR Studio). We also wanted to use the same software on all three operating systems, so Windows-only tools were out. Instead, we’re using avr-gcc, the compiler behind WinAVR, CrossPack, and Arduino.
I would appreciate any feedback on these instructions.
Continuing on the theme of my last post, here are libusb-win32 drivers for the Atmel AVRISP mkII. Unlike the Atmel-supplied drivers, these support avrdude, and as a bonus they will install on the 64-bit version of Windows 7 without digital signature errors. Yes!
Note that if you want to use the AVRISP mkII with AVR Studio, these are not the drivers you are looking for. You want the ones Atmel provides (if you installed the libusb drivers by mistake, re-run the AVR Studio installer to revert back).
For some time now, those wanting to use the Adafruit Industries USBTinyISP with the 64-bit versions of Windows 7 or Vista were faced with the following errors when attempting to install the device drivers supplied by Adafruit:
For some reason, the 32-bit versions of these operating systems don’t prevent the unsigned drivers from being installed, although they do complain.
There are a few workarounds that involve hacking Windows or disabling digital signature checking, but thanks to a tip by user wayneft on the Adafruit support forums, I was able to make the process much more straightforward.
The USBTiny drivers are based on libusb-win32. Based on some notes I found on the libusb-win32 wiki, I discovered that the latest libusb drivers contain a proper digital signature:
Vista/7 64 bit are supported from version 1.2.0.0 since a Microsoft KMCS accepted digital signature is embedded in the kernel driver libusb0.sys. libusb-win32 based device drivers can also be submitted for Microsoft WHQL testing. Several companies have successfully finished the WHQL testing with their libusb-win32 based driver package. This will allow the customers to install the driver without a warning under current 32bit/64bit Windows.
This is good news!
I downloaded the latest version of libusb-win32 (1.2.1.0) and used the included inf-wizard tool to create new drivers for the USBTinyISP:
I used the Windows device manager to upgrade the broken drivers on my Windows 7 64-bit machine. There is still a warning that “Windows can’t verify the publisher of this driver software” but there are no more errors about digital signatures and the new drivers appear to install and work correctly.
I haven’t done a huge amount of testing with the drivers, but I was able to communicate with the USBTiny via avrdude and flash a simple program to an AVR. I also haven’t tested this fix on Vista, as I don’t have access to a computer running it. If anyone tests these drivers on Vista x64, please post your results in the comments!
If you have never used it before, avr-size is a very useful command that does a relatively simple thing – it tells you how large your compiled avr-gcc programs are. This is very useful knowledge when you are trying to fit as much code as possible into a part with only a few K of flash memory. Additionally, the actual flash footprint of an AVR program is not something you can easily distill from a .hex file. Hex files are usually much larger than the actual compiled code due to the overhead of that file format.
avr-size comes with the binutils-avr package in Ubuntu (and is installed as part of WinAVR and CrossPack on Windows and OSX, respectively). Unfortunately, Ubuntu 10.04 (Lucid Lynx) ships with a broken version of avr-size that doesn’t include the necessary patches to support the AVR.
To see if your avr-size is working, open a Terminal in Lucid and try executing this command on a compiled avr-gcc .elf file of your choice:
avr-size -C --mcu=attiny2313 main.elf
You’ll probably see something like this:
avr-size: invalid option -- 'C'

Usage: avr-size [option(s)] [file(s)]

Displays the sizes of sections inside binary files

If no input file(s) are specified, a.out is assumed

The options are:

-A|-B     --format={sysv|berkeley}  Select output style (default is berkeley)

-o|-d|-x  --radix={8|10|16}         Display numbers in octal, decimal or hex

-t        --totals                  Display the total sizes (Berkeley only)

--common                  Display total size for *COM* syms

--target=<bfdname>        Set the binary file format

@<file>                   Read options from <file>

-h        --help                    Display this information

-v        --version                 Display the program's version

avr-size: supported targets: elf32-avr elf32-little elf32-big srec symbolsrec verilog tekhex binary ihex
Bad news, but it’s not surprising. You have the broken version of avr-size that comes with binutils-avr for Lucid.
The solution:
I was able to fix this issue by installing the binutils-avr package for Debian Squeeze, an approach I learned about from this Ubuntu bug report.
To download the Debian binutils-avr package, either go to the Debian package repository or execute this command:
Now install the package by double clicking on it or executing:
sudo dpkg -i binutils-avr_2.20.1-1_amd64.deb
If you tell Ubuntu to “hold” the package you just installed, it should stop trying to revert to the broken version in the Lucid repository every time you run a system update:
The status should be shown as “hold” (not “install”).
Now if you run avr-size, you should see the special AVR option ‘-C’ is now present.
jkeyzer@atom:~$ avr-size --help
Usage: avr-size [option(s)] [file(s)]

Displays the sizes of sections inside binary files

If no input file(s) are specified, a.out is assumed

The options are:

-A|-B|-C  --format={sysv|berkeley|avr}  Select output style (default is berkeley)

--mcu=<avrmcu>            MCU name for AVR format only

-o|-d|-x  --radix={8|10|16}         Display numbers in octal, decimal or hex

-t        --totals                  Display the total sizes (Berkeley only)

--common                  Display total size for *COM* syms

--target=<bfdname>        Set the binary file format

@<file>                   Read options from <file>

-h        --help                    Display this information

-v        --version                 Display the program's version

avr-size: supported targets: elf32-avr coff-avr coff-ext-avr elf32-little elf32-big srec symbolsrec verilog tekhex binary ihex
Report bugs to <http://www.sourceware.org/bugzilla/>
It works! You now have a working avr-size command for Ubuntu.
There is a good chance this package will eventually be fixed in the Lucid repository, but based on the bug report above, it could be a while (2012?) before we see an update. Until then, installing the Debian package seems to be a good solution.
If anyone reading this is close to the Ubuntu package maintainers, can you please kick them about this issue?
This is the seventh part of an ongoing series about building a low cost, open source streaming internet radio. If you haven’t already, check out the previous parts (see the links at the end of this article) for some background about the project.
In part six, we used OpenWrt’s UNIX-style shell commands to interface with mpd, the music player daemon, and redirect song and stream information to our ASUS WL-520gU wireless router’s serial port. In this part, we’ll use a Sparkfun 16×2 LCD display and a handful of other components to build an LCD status display for the radio.
The Atmel AVR Microcontroller:
After much thought, I decided to use an Atmel ATmega168 AVR microcontroller to drive the display. I realize that this raises the technical level of this project significantly, but I have been wanting to feature an AVR project on the site and this is a great opportunity. The truth is that an Arduino would work just as well and it shouldn’t be too difficult to port this program to an Arduino sketch. (The Arduino is built with the same ATmega168 microcontroller, after all.) If anyone does this, let me know and I’ll post a link to your version of the display.
If you’re an AVR veteran, you can skip over this part and straight to the bill of materials below.
If you are new to the AVR, don’t be intimidated. There are a number of tutorials online to help you learn how to use this inexpensive and powerful microcontroller. I recommend starting with this one or maybe this one, but see my note about AVR MacPack below if you’re using a Mac. If you’ve never programmed in C before, you’ll have an additional hurdle to get over, although for this project you won’t need any actual knowledge of programming or C to burn the code to the AVR and get things working.
You will need to install some software to work with the AVR, I recommend:
AVR MacPack for OS X (the Adafruit tutorial recommends OSX-AVR, use this instead)
I recommend following a tutorial or two and getting a simple blinking LED example working on your AVR before building the LCD display. That way you can be sure your programmer, development environment, breadboard, etc are working first.
Building the display:
Bill of Materials:
You will need:
one A-B USB cable (the kind with one flat and one square end)
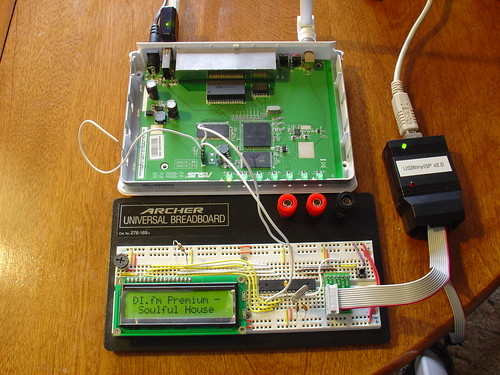
Assembling the circuit on the breadboard is pretty straightforward. Here’s a photo showing all components of the setup. The router is shown above with the serial port wired to the breadboard (the RX line is floating as we’re not using it yet). The USB AVR programmer is on the right, where it is also functioning as a 5V power supply for the circuit. Make sure the 2-pin jumper on the USBTinyISP is installed, this enables the +5V supply. The LCD is shown displaying the current stream name (DI.fm).
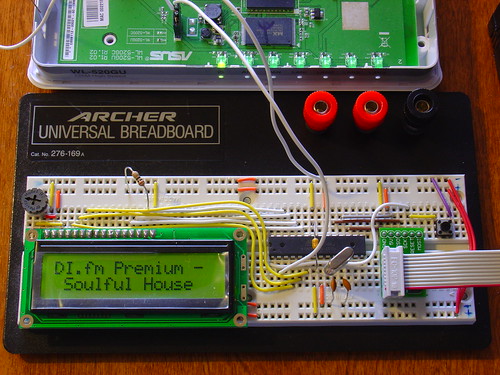
Here is a closeup of the components installed on the breadboard to show how I did things, feel free to experiment with the placement of components. As long as you follow the schematic the circuit should still work.
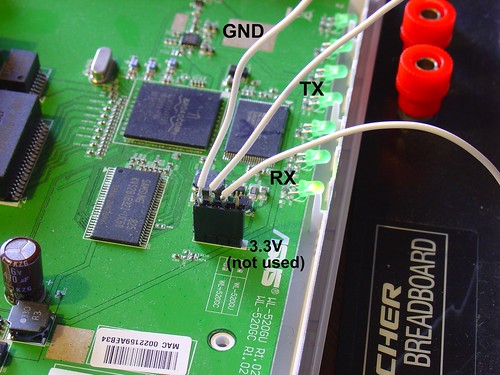
Here is a closeup of the serial port connection to the router, including the 4-pin female 0.1″ header. I soldered wires to the pins of the female header (not the pins on the board).
Once the circuit is assembled on the breadboard, we need to flash the AVR microcontroller with the main.hex file included with the firmware above.
If you’re using AVR MacPack and OS X, this should be easy (since that’s what I’m using). PC guys will need to figure this out for themselves but hopefully the process is similar (please let me know if the Makefile works).
Connect the USBTinyISP to your computer with the USB cable and to the breadboard with the ISP cable. The green light on the programmer should be on, indicating it is ready, and the backlight of the LCD should be lit, indicating that the breadboard is getting power.
Open a terminal window and create a new directory, I used ~/temp. Unzip the firmware into a directory somewhere, and execute ‘make flash’, as shown:
avrdude: Device signature = 0x1e9406
avrdude: NOTE: FLASH memory has been specified, an erase cycle will be performed
         To disable this feature, specify the -D option.
avrdude: erasing chip
avrdude: reading input file "main.hex"
avrdude: writing flash (1326 bytes):
avrdude: verifying ...
avrdude: 1326 bytes of flash verified
avrdude: safemode: Fuses OK
avrdude done. Thank you.
If everything went well, the LCD display firmware is now loaded into the ATmega168 and the circuit is ready to go. If not, double check your connections and take a look at the help! page for the USBTinyISP.
Testing the display:
Telnet or ssh into the router. Start mpd and connect to a stream using mpc (we covered this in part five).
Once the stream starts playing, execute the display.sh script we created in part six. Within a few seconds, if everything is working, you should see the stream name on the display, followed by the artist and name of the current song. Congratulations!
Here is a video of the LCD display in action, including the horizontal scrolling feature to show information that is too wide to fit within the visible area of the display:
That’s it for part seven! In part eight, we’ll start working on the input side of the user interface.
Like what you’re seeing? Have suggestions about what could be improved? Leave a comment or contact me directly.
Update:Part eight, in which I add a tuning control to the radio, is now available.
Update 2: There is a new Wifi Radio Discussion Forum, hop over there to ask questions about the project or see what other people are working on! (4/12/09)