Tag Archives: Microcontrollers

Arduino-based AVR High Voltage Programmer

Arduino-based AVR High Voltage Programmer

Update 01/02/09: A PCB version of this circuit is in the design stages – some preliminary information is here.

Update 03/11/09: Kits based on this design are now for sale!

Update 12/14/10: The original AVR HV Rescue Shield kit has been replaced by the new and improved HV Rescue Shield 2.  Visit the HV Rescue Shield 2 product page for information about the new kit!

As I mentioned earlier this week, I recently “lost” an ATmega168 due to flashing the configuration fuses to disable the RESET pin, without realizing that this makes the device impossible to reflash with SPI.  This is particularly frustrating because the device is still 100% functional, just completely deaf to ordinary serial programmers.  The only way to recover the device is using what Atmel calls “High Voltage Parallel Programming Mode” which very few programmers support, most importantly, not the USBtinyISP I otherwise love.

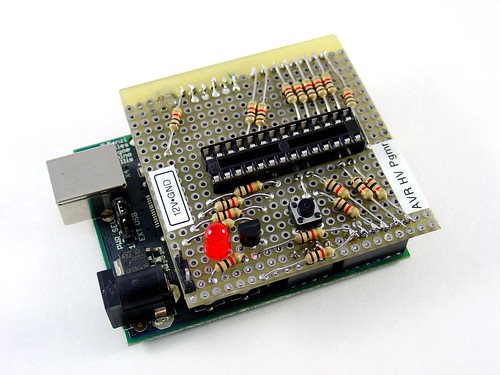
Fortunately, my trusty Arduino came to the rescue – I created an Arduino-based AVR programmer that uses the high voltage programming mode and can fix pesky fuses like RSTDISBL.

The Arduino has just enough IO to implement the entire HV protocol plus a “go” button.  So far I have only implemented setting LFUSE and HFUSE in software, but there is no reason why the code couldn’t be extended to support chip erase and programming the entire flash as well.

Overview:

The fuse programming process is simple:

  • Upload the HVFuse sketch to the Arduino, available for download here: HVFuse.pde
  • Install the shield and apply +12VDC to the terminals on the left
  • Wait for the red LED to turn on (if it isn’t already)
  • Install the ATmega to be repaired
  • Push the button
  • As soon as the LED turns back on, the AVR is fixed and ready to be put back into service!

Schematic:

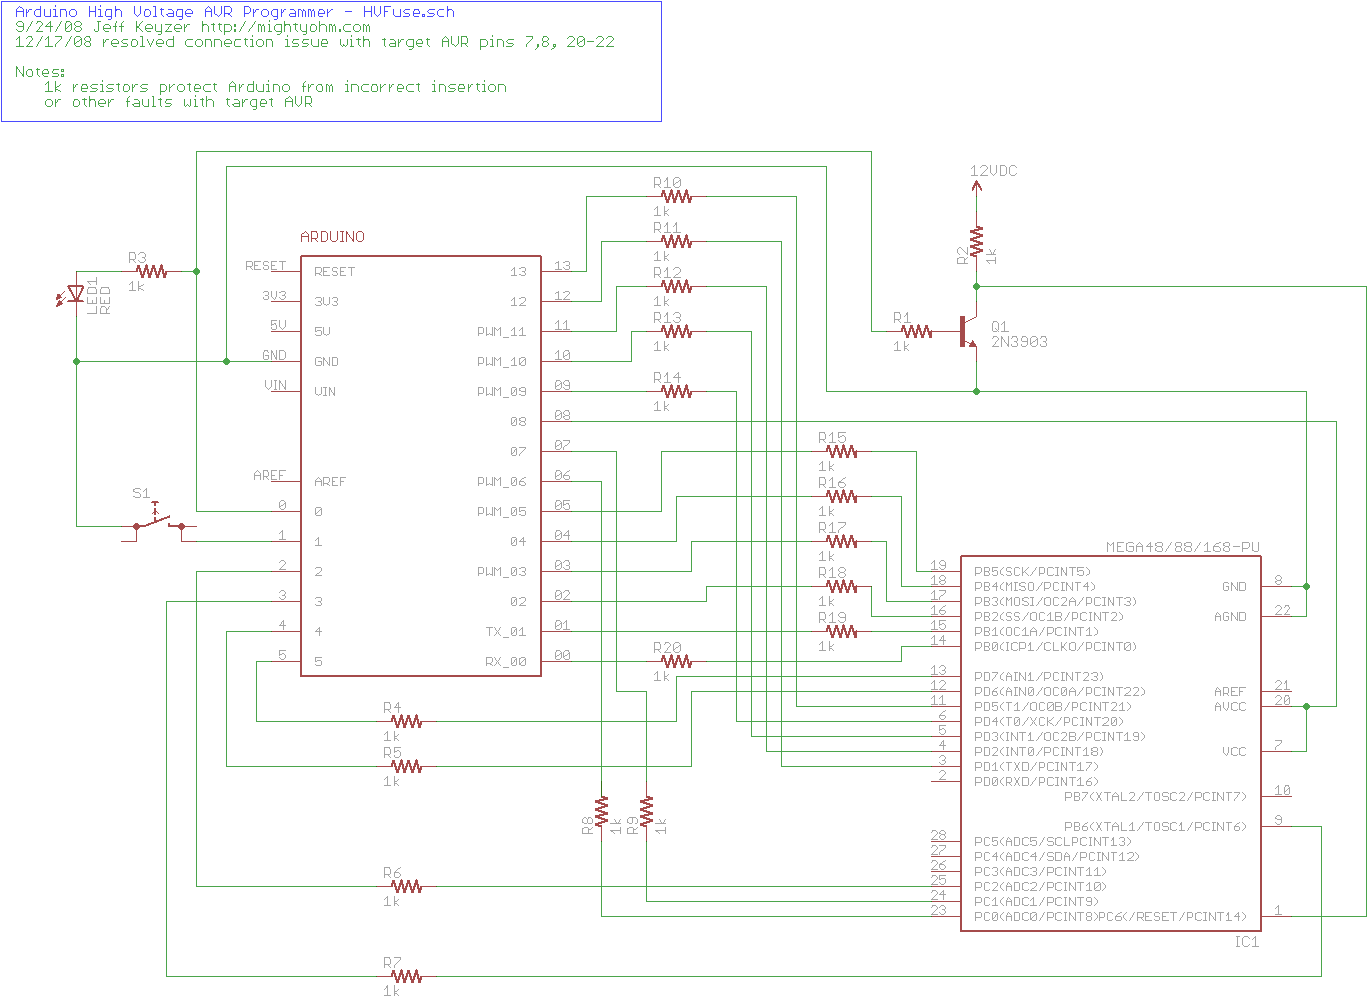
Here is an Eagle schematic of the HV Programming shield (click to enlarge):

Update 12/17/08:  An observant reader pointed out that there were three errors in the way GND/AGND, AREF and VCC/AVCC were connected on the target AVR in the original schematic.  The errors have been fixed and the updated schematic is below.  Apologies for any confusion this caused.

hvfuse_fixed.sch

Parts list:

  • An Arduino NG, Diecimila, or compatible
  • A piece of perfboard cut to size
  • Header pins for the Arduino interface (note I had to drill some of the holes to get the headers to fit the nonstandard pin spacing for digital lines 8-13.
  • An LED which indicates when it is ok to insert/remove the AVR
  • A 2N3903 or similar NPN transistor (2N2222, etc.)
  • (20) 1k resistors – these protect the Arduino from short circuits in case something goes wrong
  • A pushbutton switch – this is the ‘go’ button
  • A 28 pin socket for the target AVR

Kits!

A kit version of this project is available.  Visit the HV Rescue Shield 2 product page for more information.

I programmed the RSTDISBL fuse.

AVR microcontrollers use “fuse bits” to set various operational parameters of the device, such as the speed of the internal oscillator or the watchdog timer settings.

Most fuse bits can be set or reset without worry, that is, they can be flashed into one state and then flashed back again using an SPI programmer like the USBTinyISP.

However, some fuse bits are irreversable or at least awkward to change, similar to the code protection bits on a PIC microcontroller.

One example is the RSTDISBL fuse.  This fuse allows bit 6 of PORTC to be used as a general purpose I/O pin instead of the RESET pin.  Well, it turns out that SPI programmers need the RESET pin to flash the device.  (RESET is set as part of the routine to enter serial programming mode.)  Once the RSTDISBL fuse is set, no more SPI flashing is possible.  The only way to recover is with a high voltage programmer like the STK500, which I don’t have.

Too bad I didn’t realize that beforehand.

At least I’m not the only person who has done this before: http://support.atmel.no/bin/customer?=&action=viewKbEntry&id=13

Update: It’s alive!!!  I made a high voltage parallel programmer out of an Arduino, flashed the fuses back again, and the AVR came back to life.  The parallel programming protocol is well documented in the datasheet for the part and pretty straightforward.  I think I’ll transfer the circuit onto a perfboard just in case I ever need to do this again!

PIC RGB Video – Technical Details

This page summarizes the technical details behind my PIC LCD video project.  This is a basic tutorial on how to generate analog RGB video using a PIC16F628 microcontroller.

Previous posts on this project:

Materials needed:

  • An LCD screen like the Sharp 4L-U4EB that accepts a noninterlaced NTSC analog RGB video signal (red/green/blue and composite sync all as separate signals).  Poor quality datasheet here.
  • (1) PIC16F628 (the PIC16F628A should be a drop-in replacement.  Sorry, I have old PICs lying around.)
  • A PIC programmer – I am using a K128, but support for it has been discontinued.  Microchip’s PICkit2 is probably your best bet, but I haven’t used one (yet).
  • MPLAB – the free Microchip IDE, or a compatible PIC assembler
  • (1) 20MHz crystal (HC-18 or whatever fits your breadboard)
  • (2) 22pF ceramic capacitors
  • (3) 470 Ohm 1/8W resistors
  • (5) 10K 1/8W resistors
  • A 1K potentiometer for brightness control (if needed, my LCD needs one to display anything)
  • A regulated 5V supply for the PIC, and my LCD needed an 8V supply of its own
  • Anything else specific to your LCD – hopefully not much.

Firmware:

Schematic:

(click to enlarge)
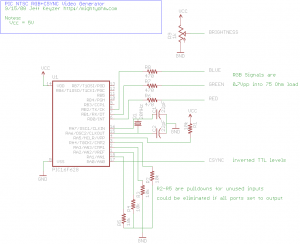
Schematic

Theory of Operation:

The LCD I chose for this project needs four main electrical signals to display video.  Three of them carry color information – red, green, and blue.  These three signals can vary from 0V (black) to 0.7V (full brightness).  To achieve this, I placed 470 ohm resistors in series with each, as shown in the schematic.  The LCD terminates each color signal with a 75 ohm resistor, so the 470 ohm series resistors serve to convert the 5V output of the PIC to a 0.7V max signal for the LCD (using a resistive divider).

The other signal the LCD needs is CSYNC – an inverse TTL composite sync signal.  This signal provides both the horizontal and vertical sync for the LCD.  Without these sync signals the image rolls across the display because the LCD doesn’t know where the image starts or ends.  Composite sync seems to be a little bit unusual – most RGB video signals have separate horizontal and vertical sync signals on separate wires.

A horizontal line of NTSC video is roughly 64μs long. (μs = microseconds)  At the beginning of each line, CSYNC is held low for 4us, then set high again.  The RGB lines are held low during sync and stay low for 8μs after sync, then set to the desired levels display the desired image on that line.  2μs before the end of the line, RGB are set low again to signal the end of the visible image.  At 64μs, the program loops back to start another line.

You can generate video like this but there would be no vertical hold – the image would be stable in the horizontal direction because we are generating a horizontal sync but not in the vertical direction.

To create a stable image with vertical sync, you have to create a valid “field” of video.  We’re creating non-interlaced video, so every field is the same (in contrast with ordinary interlaced video used in television.)  A field is composed of 262 horizontal lines.  The first line is blank, with CSYNC set low for the entire line.  This is the vertical sync.  The next 17 lines are called the “blanking interval” and occur above the visible image, during these lines horizontal sync is applied but no RGB signals.  The next line is the first visible line and consists of both a horizontal sync and RGB signals as discussed earlier.  243 lines later, we write one blank line, then loop back and repeat the process all over again.  Now we have a valid non-interlaced analog RGB video signal.

The blank lines are mostly due to compatibility with old television sets that needed time to reset the electron gun for the next field.  The nice thing is that they give us time to do housekeeping before displaying the next field.  For example, during the blanking interval I load the image to display into memory so it can be easily read back later.

The critical thing with regards to timing is that the PIC needs to execute the same number of instructions each time it loops, such that the sync signals always occur at the right time.  This is why there are a lot of ‘nop’ instructions in my code – to pad the program execution in the right spots and maintain sync.  I started by counting instructions to figure out where to put the ‘nop’s, but by the end of writing the program I was using MPLAB’s builtin “Stopwatch” feature instead.

That’s it for now!  If you have any questions, make use of these routines in your own projects, or just find this interesting, please leave a comment!

Blogs, blogs, blogs

Some interesting electronics/microcontroller/hacker themed blogs I’m reading these days:

My favorites:

And some new (to me) blogs:

That’s it for now.  If I missed any good ones, I’d love to hear about them, leave a comment or contact me.  You can access all of the blogs I mentioned (and a couple more) from the blogroll to the right.